
10400 Clarence Drive, Frisco, TX 75033
Support 24/7: 945-777-3345
Supremacy Services technician reviewing rooftop HVAC replacement options with a property owner beside a commercial packaged unit in Dallas.

How Much Does Rooftop HVAC Replacement Cost in Dallas?

Rooftop HVAC replacement cost in Dallas depends on equipment capacity and the work needed to install it. As an early budgeting reference, published U.S. estimates place a standard 6–10 ton packaged rooftop replacement at $12,000–$30,000 installed. That is a national planning range, not a verified Dallas average or a Supremacy Services quote.

The useful number is the complete project price: suitable equipment, removal, lifting, roof connections, utilities and startup. A low equipment-only listing cannot tell you what your building will cost to finish.

This guide covers packaged rooftop units used on commercial properties and some homes. If your home has an outdoor condenser on the roof connected to an indoor furnace or air handler, confirm whether you have a split system before using commercial RTU estimates.

Table of contents

What does a rooftop replacement cost?

Published estimates vary by capacity and installation scope. The following figures are useful starting points for a single packaged rooftop replacement.

Packaged rooftop capacityU.S. installed-cost planning range
3–5 tons$7,500–$16,000
6–10 tons$12,000–$30,000
15–25 tons$25,000–$60,000+

Source: PickHVAC’s commercial rooftop cost guide, published October 4, 2026. These estimates assume standard equipment, removal of one existing unit, ordinary crane access and basic connections, with no major structural work. Dallas proposals can fall outside them. Unlisted capacities require their own estimate; do not interpolate a price from the table.

Confirm which kind of system you have

A packaged rooftop unit, usually called an RTU, contains its principal cooling components and, where fitted, heating equipment in one outdoor cabinet. A split system has components in separate indoor and outdoor assemblies. ENERGY STAR’s system definitions explain that distinction.

For a homeowner, a photograph of a rooftop cabinet may not establish the configuration. Share the model information already in your records and ask the contractor what the replacement includes. Replacing a roof-mounted condenser alone is a different scope from replacing an entire packaged RTU.

What should the installed price include?
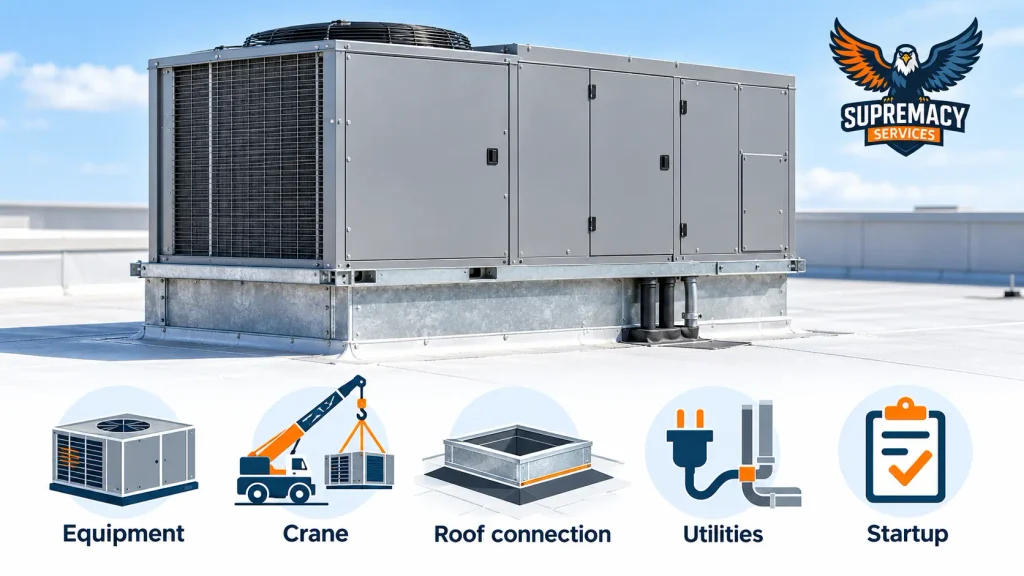
Packaged rooftop HVAC unit with illustrated icons for equipment, crane service, roof connection, utilities and startup.
A complete rooftop HVAC replacement quote should account for more than the equipment alone, including lifting, roof connections, utilities and startup.

A complete proposal should identify the equipment and every installation task included in the total. Ask the contractor to mark each item as included, excluded or subject to an allowance.

Project itemWhat to confirm in writing
New equipmentExact model, capacity, heating type, efficiency rating and options
Removal and disposalExisting equipment removal, applicable refrigerant handling and haul-away
Crane and riggingWhether the lift is included and what access assumptions apply
Roof curb and roofingReuse, adapter or replacement; responsibility for flashing and roof repairs
Duct connectionsTransitions, sealing and any separate airflow corrections
UtilitiesElectrical compatibility and modifications, gas work where applicable, condensate drainage
Controls and ventilationThermostat or building-control integration, outdoor-air settings and included accessories
Permits and inspectionsWho obtains approvals, pays fees and closes out required inspections
Startup and handoverManufacturer-prescribed checks, operating settings, documentation and warranty terms

A crane charge may already be included in an installed quote. Confirm that before adding another crane allowance to your budget.

Ask separately about tax treatment, major structural or electrical work, temporary cooling, premium scheduling and any roof repair excluded from the base price.

For help defining your project’s scope, explore Supremacy Services’ rooftop HVAC installation and replacement services.

Why do rooftop replacement quotes differ?

Two units with the same nominal capacity can require different equipment, connections and installation work. Compare the assumptions behind each total.

Capacity and current building needs

Tonnage describes cooling capacity, not the unit’s physical weight. The existing capacity is a starting point for assessment.

Tell the contractor about changes in occupancy, operating hours, insulation, windows, lighting, kitchens or equipment. Ask for a load assessment before approving a larger unit or automatically matching the old one. DOE’s guidance on proactive rooftop replacement includes appropriate sizing and replacement timing in the planning process.

A larger purchase will not necessarily solve a duct or control problem.

Roof curb and installation fit
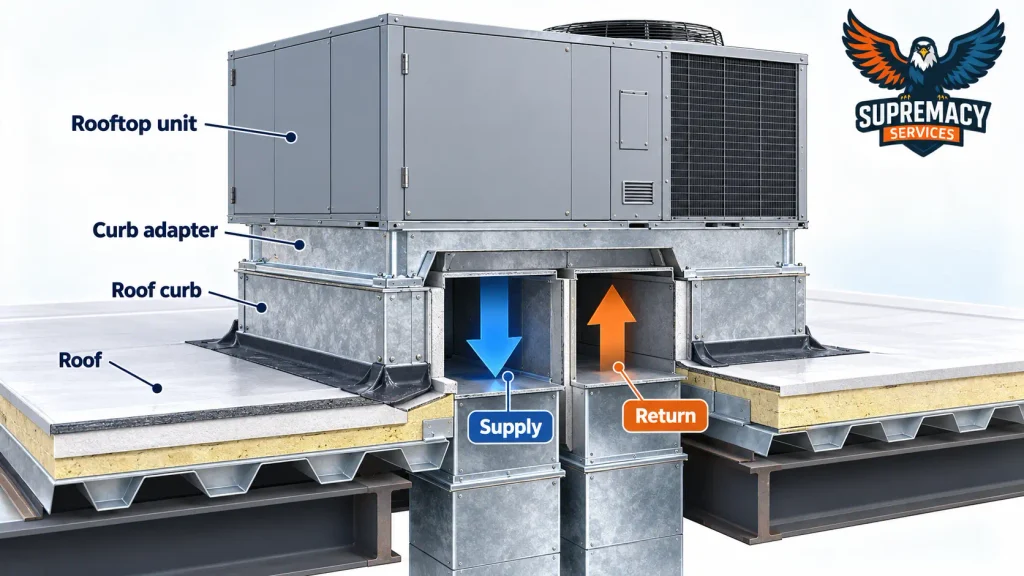
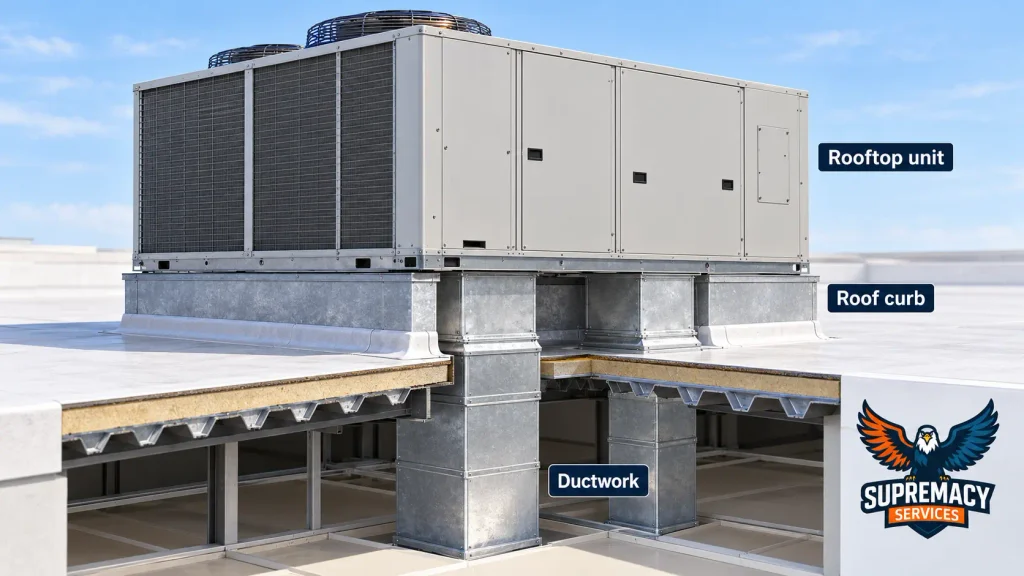
Cutaway illustration showing a rooftop HVAC unit, curb adapter, roof curb and separate supply and return duct connections.
Roof curb condition, compatibility and duct alignment can affect the scope of a rooftop HVAC replacement.

The curb is the raised base connecting the equipment to the roof and duct openings. Its dimensions, condition, support and airflow arrangement must suit the proposed unit.

Manufacturer roof-curb adapter instructions require checks of roof and curb support and account for the adapter’s effect on airflow. Depending on the actual installation, reinforcement or other modifications may be needed. shareddocs.com

Some replacement equipment is designed around compatible existing footprints. The proposal should explain whether your project needs a direct fit, an adapter or a new curb arrangement. Matching tonnage alone does not settle that question.

Crane access and project coordination

Ask where the crane will stand, what reach is required, how deliveries will enter the property and whether occupied areas need protection or temporary restrictions.
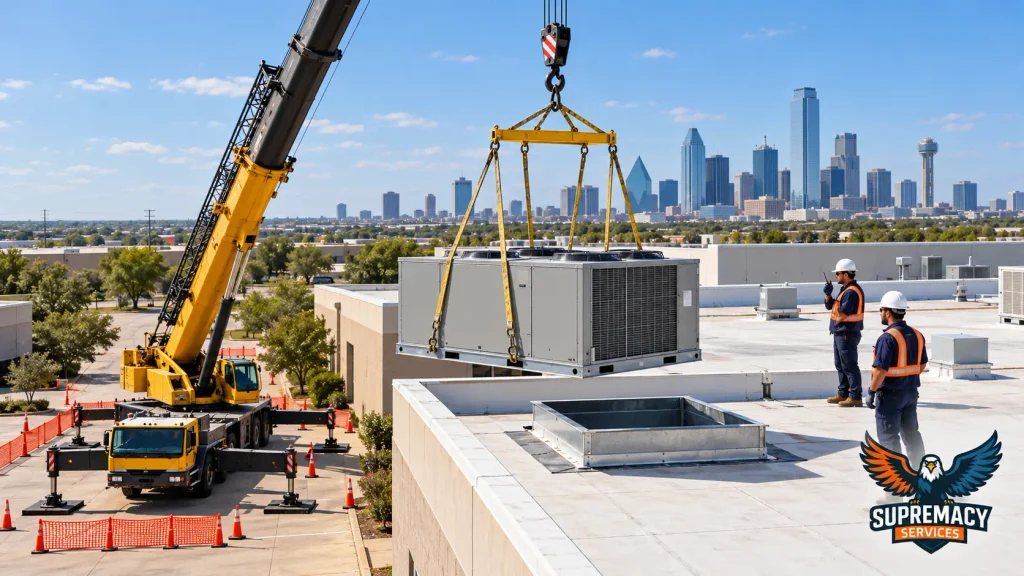
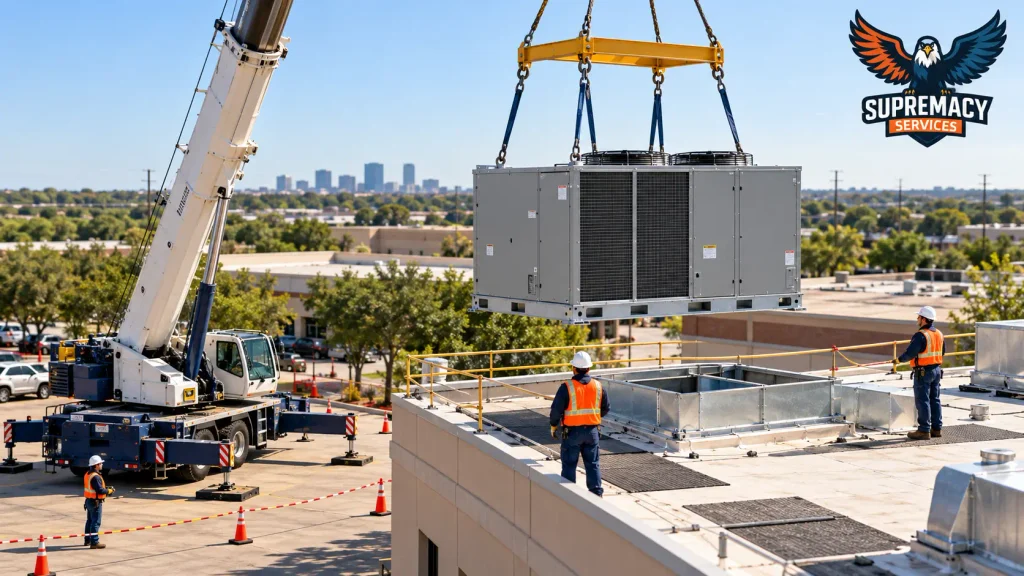
Commercial rooftop HVAC unit being lifted by crane onto a Dallas building while technicians coordinate the installation.
Crane access, staging space and lifting requirements can influence the scope of a rooftop HVAC replacement project.

A clear lift plan helps explain the scope. Shared parking, adjacent buildings, overhead obstructions or limited access hours should be addressed before the price is treated as complete.

Confirm who handles any required access approvals. A lift over a private parking area and a project involving public access restrictions may involve different coordination.

Electrical, heating and controls

Ask whether the proposed equipment matches the available voltage and phase, and whether its electrical requirements call for modifications. For gas-heated equipment, have the quote identify the relevant gas connection work.

Controls also deserve a separate line of discussion. Establish whether the replacement will use a basic thermostat, connect to existing building automation or require additional controls. Have outdoor-air and ventilation needs checked against the space’s actual use.

The question is which of these tasks your proposal includes, rather than whether every project needs every possible upgrade.

Efficiency and ongoing costs

A higher purchase price can be worth evaluating when the equipment operates for many hours, but the savings calculation needs building-specific inputs.

Ask for the proposed model’s applicable efficiency rating and an explanation of the comparison. Use consistent assumptions for operating hours, weather, utility rates and building use. Pacific Northwest National Laboratory’s Rooftop Unit Comparison Calculator provides a screening approach that accounts for local climate and performance at different loads.

An estimate of cooling-energy savings is not a guarantee that the whole electricity bill will fall by the same percentage.

What matters specifically in Dallas and DFW?

Local climate, roof access and the property’s permitting jurisdiction should shape the proposal.

Summer conditions and exposed equipment

The National Weather Service describes Dallas–Fort Worth’s hot summers and seasonal severe weather. For replacement planning, that makes cooling performance, the condition of exposed equipment and weather-sensitive scheduling practical considerations.

Tell the contractor whether comfort problems occur only during the hottest afternoons, throughout the day or in one part of the building. Those patterns help focus the assessment; they do not establish the required capacity by themselves.

Have observed hail damage or deteriorated roof details assessed before assuming a new rooftop cabinet is the entire repair.

Dallas permits and nearby cities

The City of Dallas identifies HVAC replacement as mechanical-permit work. Have the contractor confirm the requirements for your exact scope and explain who obtains the permit and arranges inspections.

Electrical alterations, structural changes or roof work may need additional coordination. Do not assume every item is covered simply because a quote says “permit included.”

For properties in Plano, Frisco, Allen or another DFW municipality, confirm requirements with the jurisdiction where the building is located. If you lease the property, establish approval, payment and roof-access responsibilities before accepting the work.

Should you repair the unit before replacing it?

Get a diagnosis before using a replacement estimate as the answer to every cooling complaint. Replacement deserves evaluation when major deterioration, recurring failures or unsuitable performance make further repairs poor value.

A single repairable fault may justify keeping an otherwise serviceable unit. For the detailed decision, read our guide to rooftop HVAC repair versus replacement.

Several symptoms can have more than one explanation:

What you noticeWhat to investigate before approving replacement
Weak coolingFilters, coils, airflow, refrigerant condition, controls and actual building load
One persistently warm room or zoneDuct distribution, airflow balance, controls and localized heat gains
Frequent starting and stoppingControl settings, safety trips, operating conditions and equipment sizing
Water near a ceiling penetrationCondensate drainage, condensation and separate roof leakage
A higher electricity billEnergy consumption, rates, weather, operating hours and equipment performance

Manufacturer rooftop troubleshooting guidance illustrates why airflow, controls, refrigerant and electrical conditions must be distinguished.

Persistent hot spots may justify a duct inspection and airflow assessment before equipment selection. Our guide to commercial rooftop HVAC lifespan in North Texas provides additional context for aging equipment.

If inspection identifies an unsafe condition, follow the professional’s shutdown and repair guidance promptly. Do not keep resetting a unit that repeatedly trips.

How should you compare replacement proposals?

Compare complete projects with equivalent performance requirements, then examine the exclusions. The lowest total is difficult to judge when the bids describe different work.

Supremacy Services technician and property owner comparing two rooftop HVAC replacement proposals covering equipment, roof work, controls and warranty.
Compare equipment specifications and included installation work before choosing between rooftop HVAC replacement proposals.

Use this sequence:

  1. Identify each unit. Match the quote to the equipment and spaces it serves.
  2. Confirm the design. Compare capacity, heating configuration, electrical requirements, efficiency and included controls.
  3. Align installation scope. Check removal, lift, curb, roofing, ductwork, utilities and permits.
  4. Separate fixed prices from allowances. Ask what triggers an extra charge and how changes will be approved.
  5. Separate delivery from downtime. Request the equipment lead time, work schedule and expected period without heating or cooling.
  6. Check completion requirements. Ask for startup records, control settings, required inspections and operating instructions.
  7. Read warranty coverage. Establish the actual parts, labor, refrigerant and access-work terms. Check exclusions and registration requirements for the exact equipment.

For example, one proposal may reuse compatible utilities and include a curb adapter, while another includes new electrical work and roof repairs. The difference cannot be evaluated fairly until those scopes are reconciled.

A complete comparison also records temporary arrangements, financing costs where relevant, expected maintenance and projected energy use. Ask for the assumptions behind any claimed payback.

Ready to turn a planning range into a property-specific scope? Request a rooftop replacement assessment and discuss the equipment, access and installation work your proposal should address.

How can you control costs and prevent repeat problems?

Plan early, document the existing equipment and maintain the system you install. That gives you more information when comparing repairs, replacements and scheduling options.
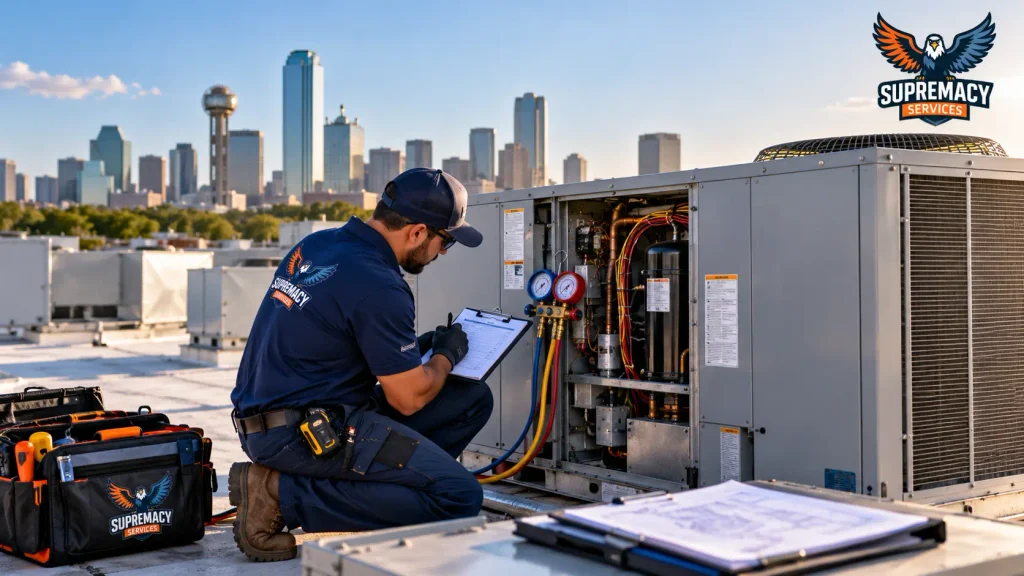
Supremacy Services technician performing startup checks and recording service information on a commercial rooftop HVAC unit.
Proper startup documentation and ongoing maintenance help protect the value of a new rooftop HVAC system.

Useful steps include:

  • Keep service invoices, model information and a separate history for each RTU.
  • Ask whether compatible existing curbs, ducts, utilities and controls can be retained.
  • Correct confirmed airflow or drainage problems that could persist after a changeout.
  • For buildings with several units, request a condition-based replacement sequence and compare coordinated versus separate work.
  • Agree on a maintenance plan based on the manufacturer’s instructions and actual operating conditions.

The national laboratory RTU maintenance guide emphasizes maintenance of items such as filters, coils, drains and controls, while preserving manufacturer-specific requirements.

Planning can improve your choice of equipment and scheduling. A particular offseason discount or guaranteed energy payback should only be included if supported by an actual offer or calculation.

What can owners do themselves?

Owners can prepare records and describe symptoms; rooftop replacement requires qualified professionals.

Collect utility bills, service history, operating schedules and equipment details already available to you. Note which areas are uncomfortable and when. Arrange building access through the owner or property manager.

Equipment lifting, electrical disconnection, refrigerant work, gas connections and commissioning involve hazards and specialized requirements. Manufacturer instructions call for trained, qualified personnel for rooftop installation and service.

Before hiring, verify the contractor’s active Texas license and confirm that its class and endorsement cover the proposed equipment. Ask for clear responsibility for any other trades involved.

Frequently asked questions

How much does a 5-ton rooftop HVAC replacement cost?

Use the 3–5 ton planning range above as an initial reference, then obtain a proposal for the exact model and property. A 5-ton label does not determine the heating configuration, roof fit, electrical work or installation scope.

Why can two 10-ton rooftop replacement quotes be different?

The units may differ in heating type, efficiency, controls or accessories. The bids may also include different amounts of crane, curb, duct, electrical and roof work. Compare model numbers and written inclusions before comparing totals.

Is crane service included in rooftop HVAC replacement?

It may be included in the installed price or listed separately. Ask the contractor to identify the lifting plan and any access assumptions. Avoid adding a second crane allowance when the quote already includes it.

Can the existing roof curb be reused?

Possibly, if its condition, dimensions, support and duct arrangement work with the new equipment. Some projects need an adapter or another modification. The contractor should verify compatibility before ordering the replacement.

Does using R-410A mean I must replace my unit now?

No. EPA explains that the HFC transition does not require retiring existing equipment simply because of its refrigerant. Condition and repair practicality still matter. Have the contractor confirm current requirements for any proposed new model; do not substitute a different refrigerant into equipment not designed for it.

Is rooftop replacement on a house priced like a commercial RTU?

Only comparable equipment and scope make a useful comparison. A house may have a packaged rooftop unit or a roof-mounted component of a split system. Identify the configuration first and request a complete residential proposal.

Can I replace one rooftop unit at a time?

A phased approach may be practical. Have the contractor check which spaces each unit serves and whether controls or ventilation affect sequencing. Prioritize condition and operational needs, then compare the logistics of separate versus coordinated replacements.

How long will the property be without cooling?

Ask for a shutdown plan separate from equipment delivery and permitting. Roof work, utility changes, weather, startup checks and the number of units affect the schedule. The proposal should identify affected spaces and any temporary arrangements.

Get a rooftop replacement plan for your property

A useful replacement proposal starts with your building, its equipment and the work needed to connect the two. Bring your service records, comfort concerns and any existing quotes so the assessment can address the same questions you are using to compare options.

Discuss your rooftop HVAC replacement with Supremacy Services to review suitable options and installation requirements for your Dallas or DFW property. Ask for a written scope that makes the equipment, installation work, exclusions and next steps clear.


Technician and property manager reviewing a tablet beside a commercial rooftop HVAC unit, with the Dallas skyline behind them.

Rooftop HVAC Repair vs Replacement: How Dallas Businesses Should Decide

Repair a commercial rooftop HVAC unit when a confirmed fault can be corrected reliably and the rest of the equipment still meets your building’s needs. Consider replacement when major problems accumulate, breakdowns disrupt the business, or the unit no longer provides suitable performance.

For Dallas businesses, rooftop HVAC repair vs replacement should come down to equipment condition, complete project costs, and the consequences of another interruption. Age is useful context, but it cannot make the decision by itself.

A rooftop unit, often called an RTU, packages cooling and, where equipped, heating components in an outdoor cabinet and distributes conditioned air through ductwork. The most useful comparison starts with that whole system, including the spaces it serves.

Table of contents

Should you repair or replace your rooftop HVAC unit?

Repair is a stronger option when the fault is isolated and the remaining equipment is sound. Replacement becomes more attractive when several major deficiencies, unreliable service, or a mismatch with the building make further repairs poor value.

The DOE rooftop unit decision framework considers condition, age, size, field evaluation, and projected economics before selecting a retrofit or replacement. www1.eere.energy.gov

Use the following comparison to guide the discussion with your contractor.

FindingRepair is more attractive whenReplacement deserves evaluation when
Failed componentOne repair has a clear cause and defined scopeSeveral expensive components have deteriorated
Overall conditionCoils, cabinet, and other major assemblies remain serviceableWidespread deterioration remains after the proposed repair
ReliabilityService records show occasional, unrelated problemsRepeat failures keep interrupting the same operation
Parts and supportCompatible parts and technical support are availableDelays or unavailable parts make recovery impractical
Building performanceThe system can meet the actual load after correctionEquipment selection or configuration no longer suits the space
Business plansRepair supports an acceptable period of continued useA planned upgrade fits the building’s longer-term needs

When another repair can be sensible

A failed control, fan component, or other replaceable part does not automatically justify discarding the whole unit. Even a compressor replacement can be reasonable if the surrounding equipment is sound, the failure’s cause is addressed, and the complete repair proposal is competitive.

Ask what the repair restores and which existing components remain a concern. A new compressor does not renew the rest of an aging RTU.

For age and maintenance context, read our guide to commercial rooftop HVAC lifespan in North Texas.

When to investigate replacement or a targeted upgrade

Repeated failures, several unresolved defects, or equipment that cannot meet the current building load justify a complete replacement proposal. An identified unsafe condition requires prompt professional attention; the assessment should establish whether a safe, durable repair remains practical.

There may also be a useful middle option: repair serviceable equipment and improve compatible controls, airflow, or economizer operation. An economizer manages outdoor-air cooling when conditions allow. A targeted improvement deserves consideration when the main equipment remains worth keeping.

What should be diagnosed before you approve major work?

Confirm what failed, why it failed, and whether the proposed work will correct the complaint. A hot building, high bill, or leaking ceiling is a symptom, not a complete diagnosis.

For example, Trane’s rooftop equipment troubleshooting guidance identifies airflow, filters, coils, refrigerant, electrical conditions, and controls among the issues technicians may need to distinguish. The exact checks depend on the equipment model.

Technician recording inspection findings on a tablet beside the condenser coil of a commercial rooftop HVAC unit.
A useful diagnosis identifies the failed component, explains the likely cause, and documents the condition of the remaining equipment.
What the business noticesWhat the assessment should distinguish
Weak cooling throughout the spaceEquipment faults, restricted airflow, dirty coils, refrigerant problems, or an unsuitable load match
One consistently warm areaDuct distribution, control zones, unusual heat gains, or airflow balance
Frequent starts and stopsControl behavior, operating conditions, safety trips, or equipment sizing
Water near a ceiling or roof penetrationCondensate drainage problems, duct condensation, or a separate roof leak
A higher electricity billActual consumption changes, weather, operating hours, electricity rates, and equipment performance

Persistent hot spots may justify a duct inspection and airflow assessment before equipment replacement is approved. In a restaurant or renovated tenant space, ask whether exhaust, outdoor-air needs, or layout changes are contributing to the complaint.

Service records are especially useful when a problem keeps returning. PNNL’s commercial HVAC maintenance guidance recommends recording diagnostic findings, corrective work, and downtime to identify recurring or system-wide problems. PNNL

Before authorizing a major repair, arrange an HVAC diagnostic evaluation and ask for a written explanation of the fault and the remaining condition of the system.

How should you compare repair and replacement costs?

Compare complete written proposals over the same planning period. Include the work needed now, ongoing costs, likely later work, and disruption to your business.

A component price and a fully installed replacement price describe different scopes. Ask what each proposal includes before comparing the totals.

Build a comparison using your own quotes

Choose a planning period that fits your property and occupancy plans. Then complete these categories for both options.

Rooftop HVAC repair and replacement options compared using icons for work now, energy, future service, and downtime.
Compare both options over the same planning period, including immediate work, energy use, future service, and business interruption.
Cost categoryRepair and keep the unitReplace the unit
Work nowDiagnosis, parts, labor, and associated corrective workEquipment and the complete installation scope
Roof and access workAccess equipment and any related roof workLift, curb or adapter, connections, and roof coordination
Future equipment workForecast repairs and replacement if needed within the periodForecast repairs and any major work within the same period
MaintenanceService needed for retained equipmentService required by the new equipment
EnergyExpected use after the repairExpected use under the same weather and operating assumptions
Business interruptionRepair downtime and plausible repeat-outage exposurePlanned changeover and any temporary arrangements
Financial adjustmentsApplicable financing costs and remaining asset valueApplicable financing costs and remaining asset value

For the project items that shape the installed price, see our Dallas rooftop AC replacement cost guide.

A crucial question is whether the repair is likely to carry the unit through your comparison period. If replacement is expected during that period, include it in the repair option. Otherwise, the comparison can make keeping the old unit look artificially inexpensive.

Past invoices help reveal reliability problems, but money already spent should not be counted again as a future expense. Ask for a reasonable range of future outcomes instead of treating a guessed failure date as certain.

Examine energy savings and downtime separately

PNNL’s Rooftop Unit Comparison Calculator can help screen equipment options using local climate, building use, and performance at different loads. It provides estimates; the actual building still needs an appropriate equipment selection and project evaluation.

Ask what supports any promised savings. Useful inputs include utility records, operating schedules, existing equipment condition, and the proposed unit’s performance. An increased bill alone does not prove that replacement will pay for itself.

For downtime, identify which spaces would lose cooling, how long the business can tolerate that condition, and the cost of temporary arrangements. Use your actual operating exposure rather than a generic lost-revenue figure. Check warranty coverage carefully: parts coverage, labor, refrigerant, access work, and response arrangements may have different terms.

Treat an age-times-repair-price formula or a fixed repair percentage as a prompt for closer review. Neither captures all the costs and operational consequences of a commercial rooftop project.

Considering a change-out? Review Supremacy Services’ rooftop AC installation options in Dallas and request an assessment of your equipment and building requirements.

What makes the decision different in Dallas and DFW?

Summer cooling performance, roof access, building use, and the permitting jurisdiction all deserve attention. Their importance depends on the property.

Hot-weather performance and changing building loads

Dallas-Fort Worth climate normals put July’s average daily high at 95.6°F and August’s at 95.8°F. That makes hot-weather operation relevant to a Dallas cooling assessment; those monthly averages are not equipment-sizing design temperatures. Normals, Means, and Extremes

Ask whether the building has changed since the existing unit was selected. More occupants, different operating hours, a restaurant build-out, or a revised floor plan can change the assessment. DOE guidance on rooftop unit sizing calls for calculating the heating and cooling load of the spaces served before equipment selection.

Roof conditions and project access

Conceptual cutaway showing a rooftop HVAC unit on a roof curb, with two duct connections extending through the roof.
Replacement planning should account for the roof curb, duct connections, and the condition of the surrounding roof.

Have the replacement proposal address the existing roof curb, which supports the unit and interfaces with the roof and ducts. Check compatibility, support requirements, roof condition, electrical supply, and gas connections where applicable.

Crane access and weather can affect the work plan. Confirm staging space, protection of occupied areas, roof access, and coordination with the building owner or roofer. If the project requires public-way restrictions, have the contractor establish the applicable approvals before scheduling the lift.

Permits and property responsibilities

Have the contractor confirm Dallas permit requirements and exemptions for the actual scope. The city’s published code includes exemptions for some mechanical work, so neither “every replacement needs a permit” nor “same-size equipment never needs one” is a reliable blanket answer.

For properties in Plano, Frisco, Allen, Garland, or another DFW municipality, confirm requirements with that jurisdiction. Tenants should also establish who can approve the project and who pays under the property agreement before accepting a proposal.

If the building has several RTUs, prioritize them by condition and the importance of the spaces they serve. Replacing the most problematic unit first may be a practical phased approach if the building’s systems allow it.

Does the refrigerant type mean you need a new RTU?

An existing unit does not automatically need replacement simply because it uses R-410A or R-22. Serviceability and compliance for proposed new equipment are separate questions.

EPA’s guidance on existing HFC equipment distinguishes equipment already in use from restrictions on new products and systems. Its guidance also explains that refrigerants such as R-32 and R-454B cannot be used in systems that were not designed for them.

EPA’s guidance for existing R-22 equipment permits continued operation and servicing with available lawful supplies. A leak, an expensive repair, or difficulty sourcing compatible components can still make replacement the better business choice.

Ask the contractor to identify the refrigerant, explain the repair options, and verify current requirements for any proposed replacement. Do not approve a refrigerant substitution on the assumption that it is a simple drop-in upgrade.

What should a professional assessment and quote include?

Crane lifting a packaged HVAC unit above a commercial roof, with workers, a roof curb, and a marked staging area visible.
Coordinate equipment delivery, crane access, roof work, and business downtime before the scheduled changeover.

Ask for enough written information to understand both the repair and the replacement. A useful scope should address the following:

  1. Equipment identity and condition. Model, capacity, refrigerant, service history, and the condition of major assemblies.
  2. Diagnosis. The confirmed fault, relevant measurements, probable cause, and what remains uncertain.
  3. Repair scope. Parts and labor, related corrective work, expected availability, exclusions, and warranty terms.
  4. Replacement design. Load assessment, suitable equipment, roof and utility compatibility, controls, and applicable approvals.
  5. Schedule and disruption. Equipment lead time, onsite work, the expected period without heating or cooling, and contingency arrangements.
  6. Completion checks. Startup and commissioning records, airflow and controls verification, required inspections, operating instructions, and a maintenance plan.

Check Texas HVAC contractor licensing requirements and verify the contractor’s active license. Refrigerant work must also meet the applicable EPA Section 608 certification requirements.

What can your staff safely do first?

Gather service invoices, operating schedules, utility records, and a list of affected rooms. Check thermostat settings and note when problems occur. Use equipment information already available in your records.

Roof access, electrical testing, refrigerant handling, gas work, and opening equipment panels should follow the site’s safety procedures and be handled by appropriately qualified personnel. Do not bypass safety controls or repeatedly reset a unit that trips.

How can you reduce the next breakdown?

Use a maintenance plan tied to the equipment manufacturer’s instructions and the building’s operating conditions. The rooftop unit maintenance guide covers filters, coils, drains, controls, and other serviceable components while emphasizing manufacturer-specific requirements.

Technician updating an HVAC maintenance log beside a replacement air filter and inspection tools, with a rooftop unit behind him.
Keep a separate service history for each rooftop unit to identify recurring problems and plan future repairs or replacement.

Keep a record for each unit showing service dates, findings, repairs, downtime, and unresolved recommendations. For sites with several RTUs, identify each unit consistently so recurring problems are easy to track.

Ask your provider which tasks your staff may perform and which require professional service. Revisit the maintenance plan after a major repair, equipment replacement, or a significant change in building use.


Frequently asked questions

Is replacing a rooftop compressor worth it?

It can be, if the failure is isolated, its cause is corrected, and the remaining unit is in good condition. Compare the complete repair price, warranty coverage, parts availability, and other unresolved defects with a complete replacement proposal.

Should a 15-year-old rooftop unit automatically be replaced?

No. Age should prompt a closer condition and reliability review. A serviceable unit with a limited repair may be worth keeping; one with recurring failures and several deteriorated assemblies may justify replacement. Use inspection findings alongside age.

Will a larger rooftop unit fix hot spots?

Not necessarily. Hot spots can involve duct distribution, controls, airflow balance, or heat gains in a particular area. Ask for a building-load and airflow assessment before approving greater capacity.

Is my R-410A rooftop unit illegal to keep using?

No. EPA’s technology-transition restrictions do not automatically require retirement of equipment already in use. Have the contractor evaluate repair practicality and verify the requirements for any new equipment being proposed.

Can we replace one rooftop unit at a time?

Often a phased project is worth evaluating. The contractor should check how the units serve different areas and whether shared controls, ventilation, or other building systems affect sequencing. Base the order on condition and operational importance.

How long will the business be without heating or cooling?

Ask for an equipment-delivery timeline and a separate onsite shutdown plan. Roof access, curb work, utilities, weather, inspections, and commissioning affect the schedule. The proposal should identify the affected spaces and any temporary arrangements.

Can a commercial tenant approve replacement?

Confirm the approval and payment responsibilities in the property’s agreement before signing. The owner or property manager may need to coordinate roof access and building work. A service estimate alone does not establish a tenant’s authority to approve the project.

Will a new rooftop unit lower our energy bill?

It may, but the result depends on equipment performance, controls, maintenance, building use, and utility costs. Ask for the assumptions behind the estimate. Avoid treating a rated efficiency improvement as a guaranteed reduction in the whole building’s bill.

Get a clear plan for your building

The next step is a diagnosis and a comparison you can use. Bring your service history, operating hours, affected spaces, and any existing repair proposal to the assessment.

Request a rooftop HVAC assessment from Supremacy Services to discuss a defined repair scope and a complete replacement proposal for your Dallas or DFW property.

Supremacy Services technician inspecting commercial rooftop HVAC units overlooking the Dallas skyline

How Long Do Commercial Rooftop HVAC Units Last in North Texas?

A commercial rooftop HVAC unit typically reaches the point where replacement planning becomes important at around 15 years, although actual service life can be shorter or considerably longer depending on the equipment, operating hours, maintenance history, installation quality and building conditions.

ASHRAE’s public service-life database reports a median service life of about 16 years for packaged rooftop DX units in its dataset. The U.S. Department of Energy likewise warns that rooftop units more than 15 years old often provide reduced service and can waste substantial energy. Neither number should be treated as an automatic expiration date. A well-maintained RTU can remain economically useful beyond that point, while a neglected or heavily loaded system may become unreliable much earlier.

For commercial buildings in Dallas and the DFW Metroplex, age matters because rooftop equipment works through a long cooling season. National Weather Service climate normals for Dallas/Fort Worth show about 2,825 annual cooling degree days and roughly 20 days per year reaching at least 100°F, reinforcing why cooling equipment performance deserves close attention in North Texas.

Table of Contents

How Many Years Should a Commercial Rooftop Unit Last?

For planning purposes, about 15 years is a useful point to begin evaluating a commercial rooftop unit more critically rather than assuming it should continue operating indefinitely.

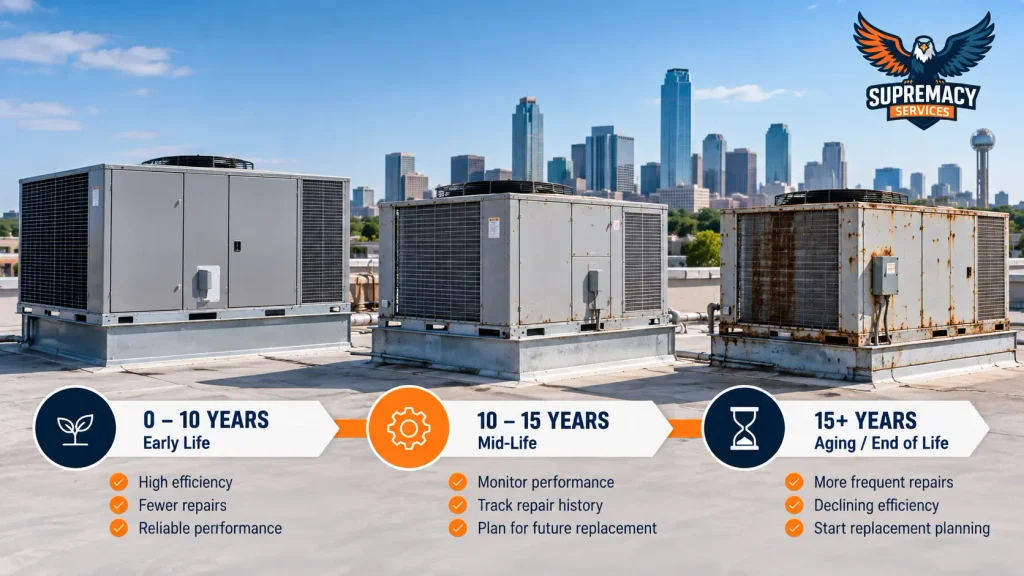
Commercial rooftop HVAC units shown at early life, mid-life and 15-plus years of age
Rooftop HVAC condition typically changes over time, making maintenance history and replacement planning increasingly important as equipment ages.

ASHRAE’s service-life database contains reported data for hundreds of buildings and thousands of pieces of HVAC equipment. For packaged rooftop DX units, the reported median is approximately 16 years. That is a statistical reference point—not a manufacturer’s promise and not a mandatory replacement age.

A commercial RTU’s real lifespan may look more like this:

Equipment conditionPractical interpretation
Under 10 yearsUsually still within an earlier or middle lifecycle phase if properly maintained
10–15 yearsIncreasingly important to track repair history, efficiency and component condition
15+ yearsReplacement planning deserves serious consideration
20+ yearsContinued operation may be possible, but reliability, parts availability and lifecycle cost deserve close review

The important distinction is between physical life and economic life.

A unit may still start, cool and heat after 18 or 20 years. That does not necessarily mean keeping it is the best business decision. Repeated repairs, declining capacity, comfort complaints, energy use and the consequences of an unexpected outage may make replacement sensible before complete mechanical failure.

The Department of Energy specifically encourages owners and facility teams to consider proactive replacement instead of automatically waiting for older RTUs to fail.

Why Rooftop HVAC Lifespan Varies

Two identical RTUs installed in the same year can reach very different conditions a decade later.

1. Operating hours and building use

A lightly occupied office that operates primarily during business hours does not place the same demand on an RTU as a restaurant, retail location, medical facility or building with extended operating schedules.

More compressor cycles, fan runtime and heating or cooling hours generally mean more component wear.

2. Preventive maintenance

Maintenance does not make equipment immortal, but it can help prevent minor operating problems from becoming major failures.

HVAC technician inspecting internal components of a commercial rooftop unit in Dallas
Regular inspections can identify developing mechanical, electrical and airflow problems before they cause major rooftop HVAC failures.

DOE guidance for unitary HVAC equipment emphasizes effective operations and maintenance to maximize efficiency, maintain occupant comfort and reduce failures.

Depending on equipment and manufacturer requirements, commercial HVAC maintenance may involve inspecting or servicing items such as:

  • filters;
  • condenser and evaporator coils;
  • belts and pulleys;
  • blower assemblies;
  • drains;
  • electrical connections;
  • contactors and capacitors;
  • refrigerant-system performance;
  • economizer operation;
  • controls and sensors;
  • heating components;
  • cabinet condition and weather exposure.

The correct schedule and procedures should follow the equipment manufacturer’s documentation and the actual building conditions.

3. Installation and commissioning quality

RTU lifespan begins with installation.

Problems involving airflow, electrical supply, curb fit, duct transitions, drainage, control setup or equipment sizing can affect performance from the beginning.

Commissioning is the process of verifying that HVAC systems are installed and operating according to their intended design criteria. DOE notes that commissioning can uncover equipment faults and control problems that waste energy and affect indoor comfort.

4. Equipment sizing

Bigger is not automatically better.

An oversized unit may cycle differently than intended and may not provide the best part-load performance or humidity control. An undersized unit can struggle during peak loads.

When replacing an RTU, the correct approach is not automatically to copy the tonnage of the old nameplate. Changes to insulation, windows, lighting, occupancy, ventilation, tenant layout and other building loads may justify a new load evaluation.

5. Maintenance history before you owned the property

Commercial property buyers and new facility managers sometimes inherit equipment with little documentation.

A 12-year-old RTU with a detailed maintenance record may present a very different risk than a 12-year-old unit that has experienced years of deferred maintenance.

If records are unavailable, physical inspection and operating data become more important.

How North Texas Conditions Affect RTUs

North Texas does not create a special universal RTU lifespan, but local operating conditions can influence how hard commercial cooling equipment works.

Commercial rooftop HVAC units operating during hot summer conditions in the Dallas area
North Texas commercial rooftop HVAC systems can face long cooling seasons and sustained summer operating demand.

Long cooling demand

Dallas/Fort Worth’s 1991–2020 normals show approximately 2,825 cooling degree days annually. July and August each account for more than 640 normal cooling degree days, illustrating how concentrated summer cooling demand can become.

That matters because a rooftop unit serving a Dallas commercial building may spend long periods operating under high cooling loads.

Hot summer days

DFW averages roughly 20 days per year with temperatures reaching at least 100°F under current climate normals.

During those conditions, a marginal RTU that seems acceptable in April or October may reveal problems with cooling capacity, airflow, condenser performance or controls.

Outdoor rooftop exposure

Unlike equipment located in protected mechanical rooms, RTUs live outdoors.

Their cabinets, condenser sections, wiring, seals and exposed components experience sun, rain, wind, airborne debris and temperature swings.

That does not mean rooftop equipment is unsuitable for Texas—it is designed for outdoor installation—but inspection and maintenance remain especially important because the equipment is continuously exposed.

Signs an RTU Is Approaching the End of Its Useful Life

Age alone should not determine replacement. A pattern of age plus declining reliability, performance or operating economics is more meaningful.

Watch for the following.

Repairs are becoming more frequent

One isolated repair does not automatically justify replacement.

A better warning sign is a trend:

  • compressor trouble followed by fan or electrical failures;
  • repeated refrigerant-related service;
  • recurring control faults;
  • repeated belt, motor or bearing problems;
  • multiple service calls during peak cooling season.

Review the total repair history, not just the latest invoice.

The unit can no longer maintain conditions reliably

An aging RTU may run but still fail to meet the building’s needs.

Possible symptoms include:

  • occupied spaces staying too warm;
  • unusually long runtime;
  • inconsistent temperatures between zones;
  • complaints increasing during afternoon peak heat;
  • system recovery taking longer after setbacks;
  • cooling performance deteriorating under high outdoor temperatures.

Those symptoms can also be caused by ductwork, controls, sensors, economizers, airflow restrictions or building-envelope problems, so diagnosis should come before replacement.

Energy use is rising without an obvious operational explanation

Higher utility bills do not prove the RTU is failing. Weather, occupancy, operating hours, utility rates and other equipment can all change consumption.

However, an older RTU that shows deteriorating performance while energy consumption rises deserves further evaluation.

DOE’s Advanced RTU resources specifically identify aging, inefficient rooftop units as candidates for proactive evaluation and replacement.

Major components are failing late in the unit’s life

A relatively minor repair on a 15-year-old unit is different from a major compressor or heat-exchanger problem on the same unit.

When a major component fails, evaluate the repair in the context of:

  1. RTU age;
  2. condition of the rest of the system;
  3. repair history;
  4. replacement-part availability;
  5. remaining expected service life;
  6. business downtime risk;
  7. efficiency of replacement options.

Parts are becoming difficult to source

A mechanically repairable unit may still create operational problems if important components are obsolete or have long lead times.

For businesses where cooling or heating is mission-critical, parts availability becomes part of lifecycle planning.

Downtime is becoming expensive

For some commercial properties, the biggest cost of an HVAC failure is not the repair invoice.

It may be:

  • lost retail traffic;
  • tenant complaints;
  • uncomfortable staff;
  • spoiled temperature-sensitive products;
  • cancelled operations;
  • emergency portable cooling;
  • after-hours service;
  • expedited equipment or crane scheduling.

That is why planned replacement and failure-driven replacement should be evaluated differently.

If your rooftop equipment is entering the 12–15+ year range and service calls are becoming more frequent, schedule a commercial rooftop HVAC assessment before deciding whether another repair or planned replacement makes more sense.

Repair or Replace an Aging Rooftop Unit?

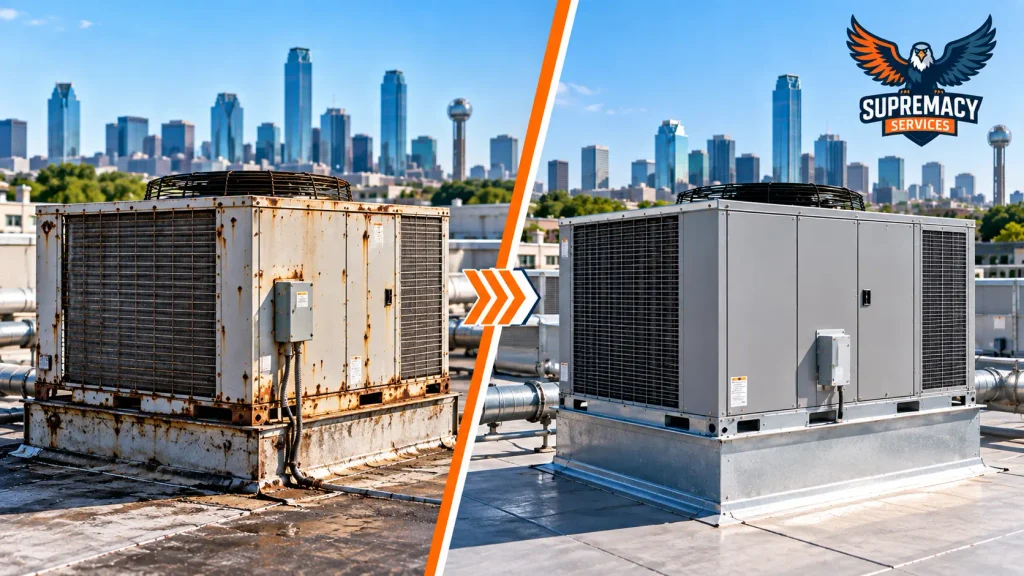
Aging rusted rooftop HVAC unit compared with a modern commercial replacement unit
Rising repairs and declining reliability can make planned RTU replacement more practical than continuing to repair aging equipment.

There is no responsible one-number formula that can make this decision for every commercial building.

Instead, compare the remaining value of the existing unit against the total consequences of keeping it.

Keep repairing when…Start replacement planning when…
The unit is otherwise in good conditionThe RTU is well into its later service life
Failure is isolated and economically reasonableMajor components are failing
Parts remain readily availableParts availability is deteriorating
Performance still meets the building’s needsComfort or capacity is becoming unreliable
Repair history is limitedRepair frequency is accelerating
Energy performance remains acceptableOperating performance has declined
Failure would create manageable disruptionUnexpected downtime would significantly affect the business

Do not base the decision only on age

A 16-year-old RTU with good performance and a limited repair history may deserve continued service.

A 10-year-old RTU with a damaged coil, serious compressor problems, installation deficiencies and repeated downtime may justify a different decision.

Do not base it only on the latest repair price

Lifecycle decisions should include more than repair cost.

Consider:

Repair cost + expected future repairs + operating performance + downtime risk + remaining useful life

versus:

Replacement project cost + expected operating performance + warranty + reduced failure risk + building needs

The correct answer depends on the actual equipment and business.

What about replacement cost?

Commercial rooftop replacement pricing varies widely enough that this lifespan article should not attempt to duplicate a full pricing guide.

Factors can include:

  • RTU tonnage and configuration;
  • heat type;
  • efficiency level;
  • curb compatibility;
  • duct transitions;
  • electrical modifications;
  • controls;
  • ventilation requirements;
  • crane access;
  • roof access;
  • structural considerations;
  • permits and inspections where applicable;
  • commissioning;
  • project phasing.

For detailed budgeting factors, see Supremacy Services’ Rooftop AC Replacement Cost in Dallas: 2026 RTU Pricing Guide.


Considering replacement? Review Supremacy Services’ rooftop AC installation options in Dallas, or request an on-site assessment so the existing RTU, curb, ductwork, electrical requirements and building load can be evaluated before equipment is selected.

Can Preventive Maintenance Extend RTU Life?

Preventive maintenance can help rooftop equipment remain reliable and efficient for longer, but it cannot reverse advanced wear or guarantee a specific lifespan.

The strongest maintenance programs do more than respond when the building becomes uncomfortable.

They track equipment condition over time.

A practical commercial RTU maintenance program can include

Filters and airflow

Restricted airflow can reduce system performance and place unnecessary stress on equipment.

Filter service should be based on the correct filter type, building use and manufacturer’s recommendations rather than an arbitrary universal interval.

Coil condition

Dirty or damaged coils can interfere with heat transfer.

Outdoor condenser coils are particularly exposed to rooftop debris and environmental conditions.

Belts, bearings and blower components

Wear in the air-moving system can affect airflow and eventually create secondary problems if ignored.

Electrical components

Loose or deteriorating electrical connections, contactors, capacitors and motors can lead to intermittent faults or shutdowns.

Economizers and outside-air controls

Economizers can improve operation under suitable conditions, but dampers and controls must function correctly.

DOE specifically recommends checking outside-air dampers and controls where HVAC systems use economizers or demand-controlled ventilation.

Refrigerant-system performance

Low capacity can result from many causes. Refrigerant-related diagnosis should be performed by qualified HVAC personnel rather than assuming that adding refrigerant is routine maintenance.

Drainage

Blocked drains or poor drainage can cause leaks and moisture problems around the unit and building.

Controls and sensors

A mechanically sound RTU can still operate poorly if sensors, schedules or control sequences are incorrect.

What Can a Building Owner Safely Check?

Commercial building staff can often perform useful observation without opening energized equipment.

Reasonable checks include:

  • note unusual noises or vibration;
  • record recurring comfort complaints;
  • watch for unexpected runtime;
  • inspect accessible filters according to facility procedures;
  • look for obvious exterior damage;
  • keep roof drains and the surrounding roof area clear where this can be done safely;
  • document service calls and component replacements;
  • compare energy use with weather and occupancy patterns.

Do not open electrical compartments, bypass safety controls, handle refrigerant systems or attempt internal repairs unless qualified to do so.

Texas regulates air-conditioning and refrigeration contracting. TDLR states that contractors installing, repairing or maintaining air-conditioning, refrigeration or heating systems must meet state licensing requirements.

What a Professional RTU Assessment Should Include

When an older rooftop unit becomes a replacement candidate, a good assessment should examine more than whether the compressor starts.

Supremacy Services technician performing a detailed rooftop HVAC condition assessment with a tablet
A professional RTU assessment reviews equipment condition, operating performance, service history and replacement risk.

1. Equipment identification

Document:

  • manufacturer;
  • model;
  • serial number;
  • approximate installation date;
  • nominal capacity;
  • heating type;
  • refrigerant type;
  • control configuration.

2. Maintenance and repair history

Look for patterns instead of isolated events.

An RTU that has required increasingly frequent repairs should be evaluated differently from one that has operated reliably.

3. Current operating condition

Depending on equipment and scope, technicians may evaluate:

  • temperature performance;
  • airflow;
  • blower condition;
  • electrical operation;
  • coil condition;
  • controls;
  • heating operation;
  • economizer function;
  • refrigerant-system performance;
  • visible cabinet deterioration.

4. Curb and duct compatibility

Replacing an RTU is not always a simple matter of lifting away one box and installing another.

Existing roof curbs, duct openings, adapters, roof conditions and unit dimensions have to be evaluated.

Supremacy’s existing Rooftop AC Unit Installation in Dallas service page should be the commercial destination for readers who move from lifecycle research to installation planning.

5. Building load and usage

Before assuming that the replacement should match the old equipment exactly, assess whether the building has changed.

Questions include:

  • Has occupancy increased?
  • Has the tenant layout changed?
  • Have operating hours changed?
  • Has insulation been upgraded?
  • Have windows or doors changed?
  • Has ventilation demand changed?
  • Has lighting density changed?
  • Have heat-producing appliances or equipment been added?

6. Replacement timing

A proactive replacement can be scheduled around business operations.

An emergency replacement happens on the failed unit’s schedule.

That difference may affect:

  • equipment availability;
  • crane scheduling;
  • tenant coordination;
  • temporary cooling;
  • project phasing;
  • procurement options.

How to Plan Replacement Before Failure

For a portfolio of rooftop units, do not treat every RTU as an isolated emergency.

Create an equipment lifecycle plan.

Step 1: Build an RTU inventory

Record each unit’s:

  • location;
  • model and serial number;
  • capacity;
  • installation year;
  • served area;
  • service history.

Step 2: Rank units by condition and business risk

A 17-year-old unit serving a storage room does not necessarily carry the same risk as a 17-year-old unit serving a restaurant dining room, medical office or critical retail space.

Step 3: Identify the highest-risk units

Prioritize units with combinations of:

  • advanced age;
  • expensive repairs;
  • poor performance;
  • scarce parts;
  • high operating hours;
  • critical spaces;
  • recurring downtime.

Step 4: Evaluate replacement options before peak season

Early evaluation creates time to compare equipment, efficiency levels, curb requirements, controls and project scheduling.

Step 5: Replace strategically rather than automatically

Not every old unit needs to be replaced simultaneously.

The DOE’s proactive RTU replacement guidance is built around evaluating equipment inventories and identifying units where replacement makes economic and operational sense.

Does a New RTU Automatically Reduce Energy Costs?

No.

Newer commercial equipment can offer improved efficiency and control capabilities, but actual energy performance depends on more than equipment age.

Results are influenced by:

  • equipment efficiency;
  • correct sizing;
  • building loads;
  • controls;
  • ventilation;
  • operating schedules;
  • duct condition;
  • commissioning;
  • maintenance;
  • weather;
  • occupancy.

DOE’s commercial rooftop resources encourage owners to evaluate high-efficiency replacement as part of a lifecycle strategy rather than simply replacing old equipment with an identical unit.

Related Problems That Can Look Like a Failing RTU

Before condemning an aging unit, rule out problems elsewhere in the system.

Duct leakage or airflow restrictions

Poor airflow can make a functional unit appear undersized or weak.

Control or thermostat problems

Incorrect schedules, sensors or building controls can cause comfort issues unrelated to major equipment failure.

Economizer problems

A stuck or improperly controlled outside-air damper can significantly affect performance.

Building-envelope changes

Doors, windows, insulation, roofing or tenant modifications can change the load the RTU has to handle.

Ventilation changes

More occupants or revised ventilation requirements can alter system demand.

Electrical problems

Voltage or electrical-distribution issues can create intermittent HVAC symptoms and should be investigated appropriately.

The goal of diagnosis is to determine whether the problem is the RTU itself, another part of the HVAC system, the building or a combination of factors.

Supremacy services

Frequently Asked Questions

How long does a commercial rooftop HVAC unit usually last?

A useful planning benchmark is around 15 years. ASHRAE’s service-life database reports a median of approximately 16 years for packaged rooftop DX units, but actual service life varies significantly with maintenance, operating hours, installation and equipment condition.

Can a rooftop HVAC unit last 20 years?

Yes. Some RTUs remain operational beyond 20 years. However, continued operation does not automatically mean continued operation is economical. Reliability, efficiency, parts availability and repair history should be reviewed.

Should I replace a 15-year-old commercial RTU?

Not automatically. Fifteen years is a good point for closer lifecycle evaluation. If the unit remains reliable and economical to operate, continued service may be reasonable. Frequent repairs or declining performance can strengthen the case for replacement.

What shortens the life of a rooftop HVAC unit?

Poor maintenance, heavy operating hours, airflow problems, installation deficiencies, control problems and unresolved mechanical or electrical issues can all contribute to premature deterioration.

Does Dallas heat reduce rooftop AC lifespan?

There is no authoritative rule assigning Dallas RTUs a specific shorter lifespan. However, Dallas/Fort Worth has substantial annual cooling demand and frequent very hot summer days, which means commercial cooling systems can experience long operating periods.

Is it better to replace an RTU before it fails?

For some businesses, yes. Planned replacement provides more control over equipment selection, scheduling, procurement and downtime. DOE guidance specifically encourages evaluation of proactive replacement for aging and inefficient rooftop equipment.

How can I tell if my commercial RTU is losing efficiency?

Possible indicators include longer runtime, declining cooling capacity, increasing comfort complaints and energy use that rises after accounting for weather and building operation. A professional evaluation is needed to identify the actual cause.

Can maintenance make an RTU last longer?

Good maintenance can reduce failures and help equipment operate more effectively, but it cannot guarantee a specific lifespan or eliminate normal mechanical wear.

Should a replacement RTU be the same tonnage as the existing one?

Not automatically. Building use, occupancy, envelope improvements, ventilation and internal loads may have changed since the old unit was installed. Replacement planning should confirm the current load rather than relying only on the old nameplate.

Final Takeaway: Use Age as a Planning Trigger, Not an Expiration Date

Commercial rooftop HVAC systems do not fail according to a calendar.
For Dallas and DFW building owners, around 15 years should be viewed as a lifecycle-review point. At that stage, examine repair frequency, operating performance, major component condition, parts availability, business-critical downtime and the economics of continued repairs.

An older unit that remains reliable may still have useful service ahead of it. An RTU with repeated failures, declining performance and escalating downtime may be better replaced before the next peak-cooling emergency.

If you’re managing an aging commercial rooftop unit in Dallas or the DFW Metroplex, schedule a rooftop HVAC assessment with Supremacy Services. The existing equipment, roof curb, ductwork, controls, electrical requirements and building needs can be evaluated before you decide whether to repair, plan a replacement or continue monitoring the system.

Sewer Line Repair vs. Replacement: How to Know Which You Need

Sewer line repair vs. replacement comes down to the condition of your existing pipe. If damage is limited to a short section and the surrounding pipe remains structurally sound, a targeted repair may be enough. If the sewer line has extensive deterioration, repeated failures, major misalignment, or collapsed sections, partial or complete replacement may be the better long-term solution.

For Dallas and DFW homeowners, the important first step is determining what is actually wrong underground. A sewer camera inspection can help distinguish an ordinary blockage from a damaged pipe—and prevent you from paying for replacement when a smaller repair would work.

This guide explains when each option makes sense, how repair methods compare, what affects cost, and what to ask a plumber before approving major sewer work.

Table of Contents

  1. Sewer Line Repair vs. Replacement: Key Differences
  2. When Can a Sewer Line Be Repaired?
  3. When Does a Sewer Line Need Replacement?
  4. Warning Signs to Watch For
  5. Sewer Repair and Replacement Methods
  6. Cost Factors in Dallas
  7. How Plumbers Determine the Right Solution
  8. North Texas Considerations
  9. DIY vs. Professional Repair
  10. How to Prevent Future Sewer Problems
  11. Frequently Asked Questions

Sewer Line Repair vs. Replacement: What’s the Difference?

Sewer line repair fixes a specific problem while preserving some or most of the existing pipe. Sewer line replacement installs new piping in place of a damaged section or an entire sewer run.

Both approaches can be appropriate. The correct choice depends on the extent of the damage, pipe condition, alignment, accessibility, and expected long-term performance.

FactorSewer line repairSewer line replacement
Main purposeCorrect a localized defectRenew a failed section or line
Best suited forIsolated cracks, joints, or damaged sectionsWidespread deterioration, collapse, or repeated failures
Existing pipeMostly retainedPartially or completely replaced
ExcavationSometimes limitedMay involve trenching or access pits
Initial costOften lower for a small repairOften higher for extensive work
Long-term valueGood when remaining pipe is soundBetter when much of the pipe is unreliable
Future problemsUnrepaired sections may still deteriorateReplaced sections eliminate existing defects in that portion

An important distinction: replacement does not necessarily mean excavating your entire yard. Certain trenchless techniques can install new piping with less surface disturbance than conventional trenching.

The U.S. Environmental Protection Agency documents both localized repairs and several sewer rehabilitation and replacement methods, each with different technical limitations.

When Can a Sewer Line Be Repaired Instead of Replaced?

Supremacy Services plumber connecting a replacement PVC sewer pipe section to an older underground pipe using a repair coupling.
A targeted sewer repair can correct an isolated damaged section without replacing the entire underground sewer line.

A sewer line can often be repaired when the damage is localized, the pipe retains sufficient structural integrity, and the remaining line can continue functioning reliably.

1. A Small Section of Pipe Is Cracked

A crack confined to one accessible section may be repaired by removing the damaged portion and installing new piping with appropriate connections.

The plumber should also investigate why the crack developed. A repair that ignores continuing movement or inadequate pipe support may not resolve the underlying problem.

2. One Pipe Joint Has Separated

Sewer pipes connect through joints that can deteriorate or shift.

If a single joint has become misaligned or separated, a targeted repair may restore the connection.

However, multiple displaced joints can suggest a larger alignment or ground-support problem requiring a more comprehensive solution.

3. Tree Roots Have Entered Through a Localized Opening

Tree roots can enter sewer lines through cracks or defective joints.

Professional root removal may restore wastewater flow, but clearing the roots does not necessarily seal the opening that allowed them inside.

If the pipe remains sound, a localized structural repair may address the defect. If roots have entered through multiple failing joints, broader rehabilitation or replacement may be warranted.

4. A Short Pipe Section Has Deteriorated

Sometimes most of a sewer line is in reasonable condition, but one section has become badly corroded or otherwise damaged.

Replacing only that section can be more practical than replacing the entire line.

The key is confirming that the remaining pipe has enough serviceable life to justify retaining it.

5. The Pipe Is Structurally Sound but Has a Repairable Defect

Some sewer pipes can be rehabilitated internally with approved lining systems.

However, lining is not suitable for every defect. The pipe must be evaluated for geometry, access, structural condition, cleaning requirements, and compatibility with the proposed lining method.

When to call a professional: If recurring clogs, root intrusion, or a suspected broken joint continue after drain cleaning, arrange a sewer camera inspection rather than repeatedly treating the symptoms.

For homeowners in Dallas and the surrounding Metroplex, Supremacy Services offers professional sewer line repair and replacement assessments to help determine which approach is appropriate.

When Does a Sewer Line Need to Be Replaced?

Plumbing technician inspecting a severely corroded underground sewer pipe with broken walls and tree root intrusion.
Extensive corrosion, structural damage, and root intrusion can make sewer line replacement more practical than repeated repairs.

Replacement becomes more appropriate when the pipe has extensive structural damage, cannot maintain proper wastewater flow, or is likely to continue failing despite localized repairs.

1. The Sewer Pipe Has Collapsed

A collapsed sewer pipe may no longer provide an open passage for wastewater.

When a section has lost its shape or structural support, cleaning alone cannot restore the pipe.

The damaged section generally needs replacement or another engineered solution suitable for the actual condition.

A collapsed portion does not automatically require replacing every foot of sewer line. The plumber should determine whether the failure is isolated or part of a larger pattern.

2. Multiple Sections Are Damaged

One cracked joint is different from a line containing numerous cracks, separations, and deteriorated sections.

When several areas require repair, the combined cost and disruption of multiple spot repairs may approach or exceed the value of replacing a longer section.

3. The Pipe Has Extensive Corrosion or Deterioration

Older metal sewer pipes may deteriorate internally over time.

If a camera inspection reveals extensive corrosion, weakened walls, or loss of structural integrity, patching one defect may leave other weak sections in place.

The decision should depend on actual pipe condition rather than age alone.

4. The Sewer Line Has a Serious Belly or Slope Problem

A sewer belly is a low section of pipe where wastewater and solids can accumulate because the line no longer maintains its intended slope.

Minor irregularities do not always require replacement. But a pronounced belly that repeatedly traps waste may need excavation, regrading, and replacement of the affected section.

A lining system generally follows the existing pipe alignment, so it cannot be assumed to correct an improper slope.

5. Repairs Keep Failing

If the same sewer line repeatedly develops problems after properly completed repairs, the remaining pipe may no longer be a reliable candidate for isolated fixes.

Before approving full replacement, request a current inspection showing where failures are occurring and why another spot repair would be insufficient.

6. The Existing Pipe Cannot Be Reliably Rehabilitated

Some pipes have severe deformation, large missing sections, extensive offsets, or other conditions that make certain trenchless lining methods unsuitable.

In those situations, a partial or full replacement may be necessary.

The EPA identifies conventional excavation and pipe bursting among the available lateral replacement techniques, while emphasizing that method suitability depends on the pipe and site conditions.

What Are the Warning Signs That Your Sewer Line May Need Replacement?

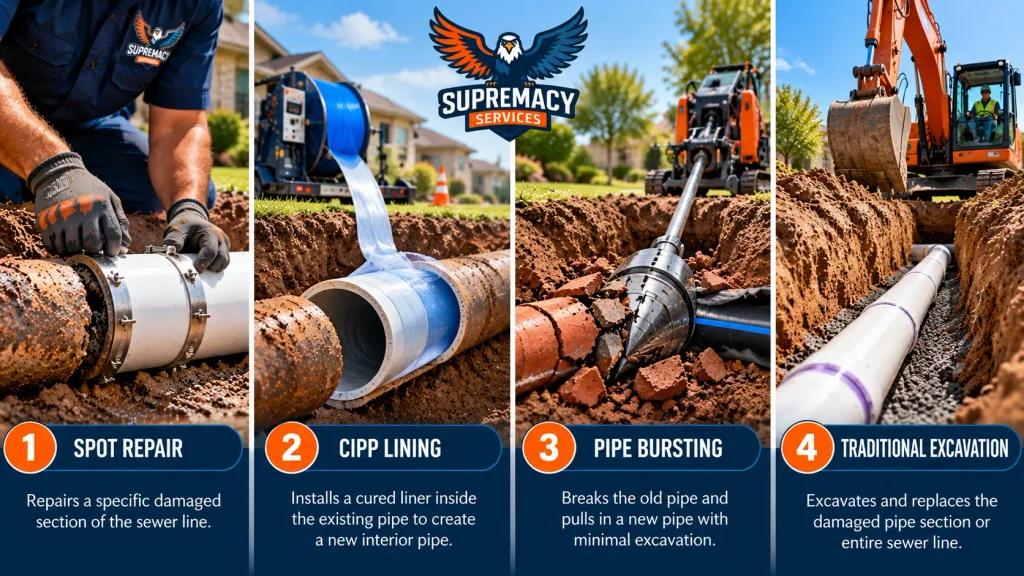
Four-panel infographic comparing sewer spot repair, cured-in-place pipe lining, pipe bursting, and traditional excavation.
Sewer repair options include spot repairs, CIPP lining, pipe bursting, and traditional excavation, depending on pipe condition and site requirements.

Recurring sewage backups, multiple slow drains, persistent sewer odors, and repeated blockages can indicate a serious sewer problem. However, symptoms alone cannot tell you whether repair or replacement is necessary.

Pay attention to the following:

  • Multiple sinks, showers, or toilets draining slowly at the same time.
  • Sewage backing up through a shower, tub, or floor drain.
  • Gurgling sounds when other fixtures are used.
  • Recurring clogs shortly after professional cleaning.
  • Persistent sewage odors inside or outside the home.
  • Wet, sunken, or foul-smelling areas in the yard.
  • Visible roots, displaced joints, deterioration, or collapse during a camera inspection.

These symptoms can have different causes. For example, one slow bathroom sink may simply have a localized blockage, while several fixtures backing up together can indicate a restriction farther downstream.

For a more detailed explanation, read our guide to the 10 warning signs of a damaged sewer line.

Does a Sewer Backup Always Mean the Pipe Is Broken?

No. A sewer backup can result from grease accumulation, foreign objects, root intrusion, or other blockages without complete structural failure.

A plumber may be able to clear the obstruction and confirm that the pipe remains serviceable.

If backups recur, further investigation is important because cleaning may only provide temporary relief when structural defects remain.

What Are the Different Sewer Repair and Replacement Methods?

Several methods are available, ranging from targeted excavation to trenchless rehabilitation. The best method depends on the damage rather than which technology sounds most convenient.

1. Spot Repair

A plumber excavates a limited area, removes the damaged pipe section, and installs replacement piping with suitable connections. Best for localized defects when the surrounding pipe remains sound.

2. Cured-in-Place Pipe (CIPP) Lining

A liner is installed inside a suitable existing pipe and cured to create a new interior pipe structure. This can reduce excavation, but the host pipe must meet the method’s requirements.

3. Pipe Bursting

Specialized equipment breaks or splits the old pipe while pulling new piping through its alignment. Access pits are still generally required, and nearby utilities and pipe geometry affect suitability.

4. Traditional Excavation and Replacement

The damaged sewer is exposed, removed, and replaced. Excavation may be necessary for severe offsets, slope correction, complex connections, or other conditions that trenchless methods cannot adequately address.

Is Trenchless Sewer Repair Always Better?

No. Trenchless methods can reduce disruption, particularly when a sewer runs beneath a driveway, patio, or established landscaping.

However, they are not universally appropriate. A pipe with significant alignment problems, severe deformation, or inadequate access may require conventional excavation.

A proper recommendation should compare the feasibility, total cost, expected performance, and site restoration requirements of each suitable method.

Sewer Line Repair vs. Replacement Cost in Dallas: What Affects the Price?

A localized sewer repair will often cost less than replacing a long section of underground pipe, but the actual price depends on the work required.

There is no reliable universal price for every Dallas sewer line because two properties with similar symptoms can have very different underground conditions.

Instead of presenting unsupported price ranges, the following table shows what influences an estimate.

Cost factorWhy it matters
Length of damaged pipeLonger replacement sections require more material and labor
Pipe depthDeeper excavation can increase complexity
Damage severityCollapse and major misalignment may limit repair options
Existing pipe materialMaterial condition affects removal and connection methods
AccessPipes beneath slabs, driveways, or structures can be harder to reach
Repair methodSpot repair, lining, pipe bursting, and excavation have different costs
Landscaping and hardscapeRestoration can add significant work
Permits and inspectionsRequirements depend on the municipality and scope
Nearby utilitiesUtility conflicts may require additional precautions
Multiple defectsSeveral repairs may make replacement more economical

Is Repair Always the Cheaper Option?

Not necessarily.

Consider two hypothetical situations.

Scenario A: One damaged joint

A sewer line is otherwise in good condition, but one accessible joint has separated. A targeted repair may resolve the issue without disturbing the rest of the line.

Scenario B: Multiple failing sections

An older sewer has numerous deteriorated joints, recurring blockages, and structural defects across much of its length. Repairing each problem separately could become expensive without providing dependable long-term performance.

The second situation may justify replacement even when individual spot repairs appear cheaper initially.

What Should Be Included in a Sewer Repair Quote?

Before accepting an estimate, ask for a written scope covering the damaged section, proposed repair method, materials, excavation, permits, inspections, backfilling, surface restoration, and warranty terms.

Clarify which items are included and which could create additional charges.

Considering a major sewer repair? Ask Supremacy Services about Dallas sewer repair and replacement options so you can compare an appropriate repair with a longer-term replacement solution.

How Do Plumbers Determine Whether to Repair or Replace a Sewer Line?

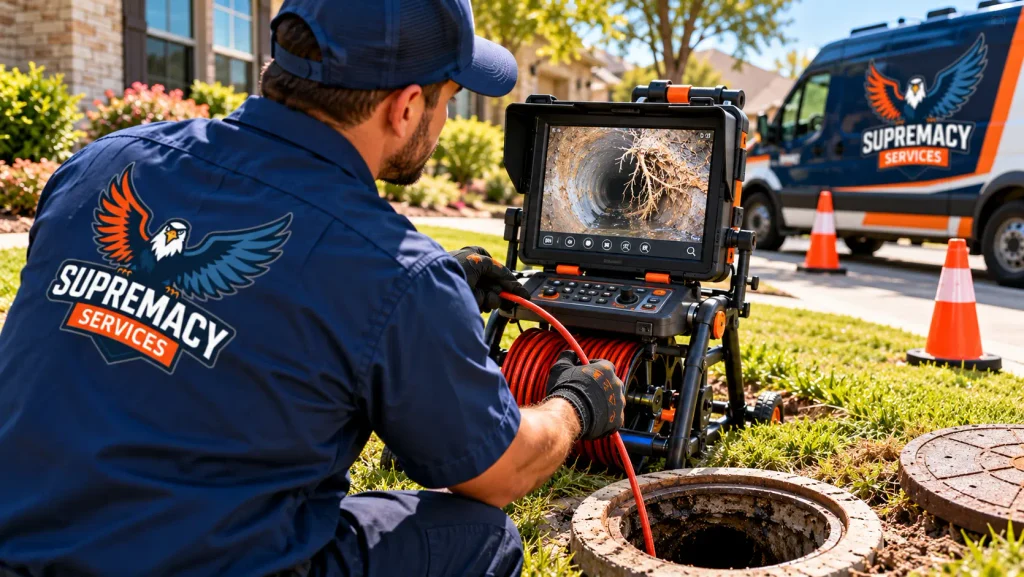
Supremacy Services technician using a sewer inspection camera and monitor to identify tree roots and damage inside a residential sewer pipe.
A sewer camera inspection helps plumbers identify hidden pipe damage and determine whether repair or replacement is appropriate.

A professional should determine the location, cause, and extent of damage before recommending major sewer work.

A typical evaluation includes the following steps.

Step 1: Review the symptoms

The plumber asks about backups, recurring clogs, affected fixtures, and previous repair history.

Step 2: Inspect the sewer with a camera

The technician checks for cracks, roots, offsets, deformation, deterioration, and blockages. Cleaning may be needed first to obtain a usable view.

Step 3: Locate and assess the defects

The technician identifies damaged sections and evaluates whether the problem is isolated or widespread.

Step 4: Compare suitable solutions

The plumber considers spot repair, partial replacement, lining, pipe bursting, or excavation based on the findings.

Step 5: Explain the recommendation and quote

The homeowner receives a proposed scope of work and can ask why the selected method is preferable to the alternatives.

Questions to Ask Before Approving Sewer Replacement

A homeowner should understand the reason for replacement before committing to the work.

Ask the plumber:

  1. Can I see the camera footage showing the damage?
  2. Is the problem limited to one section or spread throughout the line?
  3. Can the damaged section be repaired without replacing the entire sewer?
  4. Is trenchless rehabilitation or replacement technically suitable?
  5. Will the proposed method correct the underlying cause?
  6. What restoration, permits, and inspections are included?
  7. What warranty applies, and what are its exclusions?

If the explanation is unclear, requesting a second professional opinion can be reasonable for a major project.

What Should Dallas and DFW Homeowners Consider?

North Texas properties can present different sewer repair challenges depending on construction age, soil conditions, landscaping, and where the pipe is located.

Expansive Soil and Ground Movement

Some North Texas soils contain expansive clay that changes volume as moisture conditions change.

Ground movement can place stress on buried pipes and connections. However, soil conditions alone do not prove the cause of a sewer failure.

A plumber should evaluate the pipe’s actual condition and alignment rather than attributing every damaged sewer to shifting soil.

Older Sewer Materials

Some older Dallas-area homes have cast-iron or clay sewer piping, while other properties use different materials.

Older material does not automatically mean replacement is necessary. A well-supported pipe with limited defects may remain serviceable.

The inspection should establish whether deterioration is localized or extensive.

Trees and Landscaping

Established trees can complicate underground sewer work.

Roots may enter existing pipe defects, while excavation around large roots may affect landscaping and require additional planning.

Trenchless methods can sometimes reduce surface disturbance, but feasibility must be assessed.

Who Is Responsible for the Sewer Line?

In Dallas, the boundary between a private building lateral and the public wastewater service connection matters.

City documentation distinguishes homeowner and Dallas Water Utilities responsibilities around the property line. It is important to verify the actual location and ownership of a defect before authorizing work, particularly near the street or utility easement.

Other DFW municipalities can have different policies. For example, Carrollton publishes a specific sewer-stoppage policy addressing private lateral ownership and certain repairs in the public right-of-way.

Permits and Licensed Plumbing Work

Sewer replacement may require permits and inspections, depending on the scope and municipality.

Dallas Water Utilities’ published procedures include sewer-lateral permit and connection-inspection requirements.

Texas plumbing licensing is administered by the Texas State Board of Plumbing Examiners. Homeowners can use its licensed plumber lookup when verifying a plumbing professional.

Can You Repair a Sewer Line Yourself?

Homeowners can investigate simple fixture-level clogs and adopt preventive habits, but underground sewer repair is generally not a suitable DIY project.

The work may involve wastewater exposure, buried utilities, excavation hazards, structural pipe connections, and local permitting requirements.

You can safely take some preliminary steps:

  • Stop using fixtures if sewage is actively backing up.
  • Avoid flushing additional waste into a blocked system.
  • Keep children and pets away from contaminated areas.
  • Record when the symptoms occur and which fixtures are affected.
  • Arrange a professional evaluation when problems are widespread or recurring.

Avoid digging toward a suspected sewer line or attempting structural repairs without the necessary expertise and authorization.

Also avoid repeatedly using chemical drain cleaners when the underlying problem is unknown. They will not restore a collapsed pipe or fix a separated joint.

How Can You Prevent Future Sewer Line Problems?

Not every sewer failure is preventable, but sensible maintenance can reduce avoidable blockages and help identify developing problems.

Keep Grease and Food Waste Out of Drains

Do not pour cooking oil, grease, or fats into the sink. These materials can accumulate inside drainage systems.

Flush Only Toilet Paper and Human Waste

Wipes, hygiene products, paper towels, and similar materials can contribute to sewer blockages—even when marketed as flushable.

Address Recurring Clogs Promptly

A blockage that repeatedly returns may indicate roots, pipe deterioration, a low section, or another unresolved condition.

Be Careful With Tree Planting

Consider the location of underground sewer lines before planting trees with extensive root systems near buried plumbing.

Keep Inspection Records

If your sewer line has been inspected or repaired, retain camera footage, invoices, repair locations, and material information.

These records can help future plumbers identify recurring problems and avoid unnecessary repeat work.

Schedule Inspections When Symptoms Justify Them

Not every homeowner needs frequent sewer camera inspections. They are particularly useful when buying a property with uncertain plumbing history, investigating recurring backups, or evaluating known sewer damage.


Frequently Asked Questions

1. Is it better to repair or replace a sewer line?

Repair is often preferable for isolated damage when the remaining pipe is sound. Replacement may be more appropriate for extensive deterioration, repeated failures, collapse, or significant alignment problems. A camera inspection helps establish which option is justified.

2. Can you replace only part of a sewer line?

Yes. Partial sewer line replacement is possible when damage is limited to a defined section. The remaining pipe must be in suitable condition, and the new section must connect correctly to the existing system.

3. How do I know if my sewer pipe is beyond repair?

Extensive corrosion, multiple collapsed sections, severe deformation, widespread joint failure, or recurring structural problems may indicate that replacement is more practical. A professional inspection is needed to confirm the extent of damage.

4. Can trenchless sewer repair fix a collapsed pipe?

Not every trenchless method can. Lining may be unsuitable when a pipe has collapsed or lost its required shape. Pipe bursting may be an option for certain replacement projects, but site conditions, access, and existing pipe geometry must be evaluated.

5. How long does sewer line replacement take?

The timeline depends on the length and depth of the pipe, access, excavation requirements, permits, inspections, weather, and restoration. A short accessible section may take much less time than a complex replacement beneath hardscaping or structures.

6. Does homeowners insurance cover sewer line replacement in Texas?

Coverage depends on the policy and the cause of damage. Ordinary deterioration and maintenance-related failures are often excluded, while certain sudden damage or resulting losses may be treated differently. Review your policy and ask your insurer about service-line coverage or endorsements.

7. Will sewer line replacement damage my yard?

Traditional excavation can disturb lawns, landscaping, and hardscaping. Some trenchless techniques reduce surface disruption, although access pits and restoration may still be necessary.

8. Should I replace an old cast-iron sewer line?

Not solely because it is old. Replacement becomes more compelling when inspection reveals extensive corrosion, structural deterioration, repeated failures, or other conditions that make continued repairs unreliable.

9. Can tree roots be removed without replacing the sewer line?

Sometimes. Professional root removal may restore flow, but the opening that allowed roots to enter may remain. A camera inspection can determine whether cleaning, structural repair, or replacement is appropriate.

Get the Right Sewer Solution for Your Dallas Home

A damaged sewer line does not always require complete replacement. In some cases, a targeted repair can restore reliable wastewater flow. In others, replacing a deteriorated section or an entire sewer run may offer better long-term value.

The important decision is not simply which option costs less today. It is which solution properly addresses the damage without leaving avoidable problems behind.

Supremacy Services provides sewer line repair and replacement assessments throughout Dallas and the DFW Metroplex, including evaluation of traditional and trenchless options.

Explore Supremacy Services’ sewer repair and replacement solutions to request an assessment and understand the options for your property.

Pest control technician inspecting a North Texas home foundation for signs of termite activity

Termite Treatment Cost in North Texas; 2026 Guide

Termite treatment in North Texas can cost anywhere from a few hundred dollars for a limited treatment to several thousand dollars for a larger or more complicated infestation. As a Dallas-specific budgeting reference, Angi’s 2026 cost guide reports an average termite-treatment cost of about $615, with most Dallas projects in its dataset falling between approximately $281 and $949. Its reported one-time treatment range extends from about $85 to $1,300. These figures are third-party market estimates—not Supremacy Services pricing or guaranteed quotes.

The actual price for your Dallas-Fort Worth property depends on much more than square footage. The termite species, location and extent of activity, foundation construction, treatment method, amount of perimeter requiring treatment, accessibility, monitoring requirements and warranty terms can all change the scope of work.

For that reason, homeowners should use online averages for budgeting, not as substitutes for an inspection and property-specific treatment proposal.

Table of Contents

  1. How much does termite treatment cost in North Texas?
  2. Termite treatment costs by method
  3. What determines your actual termite treatment cost?
  4. Signs you may need a termite inspection
  5. Termites vs. ants and other look-alikes
  6. DIY vs. professional termite treatment
  7. What professional termite treatment includes
  8. What should be included in a Texas termite quote?
  9. How to reduce the risk of future termite problems
  10. Frequently asked questions

How Much Does Termite Treatment Cost in North Texas?

A reasonable 2026 budgeting range for termite treatment is several hundred dollars to several thousand dollars, depending primarily on the treatment method and scope of the infestation.

For Dallas specifically, Angi reports an average of approximately $615, with a typical range of $281–$949. Its Dallas data places one-time termite treatments at approximately $85–$1,300, while larger infestations can move beyond that range.

Another 2026 pricing source, HomeGuide, gives a much broader national range of approximately $225–$2,500 for chemical or bait-station treatments and approximately $2,000–$8,000 for whole-home tenting.

Those numbers should not be interpreted as a Supremacy Services price list.

They demonstrate something more useful: there is no meaningful universal price for termite treatment without first knowing what is being treated.

2026 Termite Treatment Cost at a Glance

Treatment situationPublished market guidanceImportant consideration
Dallas termite treatment overall$281–$949 typical rangeAngi Dallas estimate
Dallas averageAbout $615Third-party market estimate
Dallas one-time treatment$85–$1,300Depends heavily on scope
Chemical/bait treatment nationally$225–$2,500HomeGuide 2026 range
Whole-home tenting nationally$2,000–$8,000Usually a substantially different treatment scope
Professional termite inspectionVaries by provider/propertyConfirm before scheduling
Illustration showing factors that affect termite treatment cost in North Texas
Home size, foundation design, termite activity, accessibility, treatment method, and monitoring needs can all affect the final treatment quote.

These ranges come from third-party pricing publications and are intended only to help homeowners establish a preliminary budget. Your actual North Texas quote may be lower or higher.


Termite Treatment Costs by Method

Treatment method is one of the biggest factors affecting the final price. A small localized treatment, a complete liquid soil treatment and a monitored bait-station system are fundamentally different services.

The EPA identifies liquid soil-applied termiticides and termite baits among the recognized approaches used to protect structures against termites.

Liquid termite treatment and termite bait stations around a North Texas home
Liquid soil treatments and termite bait systems use different approaches to protecting a home from subterranean termites.

Liquid Soil Treatment

Liquid termite treatments typically involve applying an appropriately labeled termiticide to soil around relevant portions of the structure.

Depending on the building, treatment can require trenching, carefully treating soil and working around concrete slabs or other construction features.

Because the amount of material and labor can increase with the length and complexity of the foundation perimeter, two homes with similar interior square footage can still receive different quotes.

Termite Bait Stations

Termite bait systems use stations installed at appropriate locations around a property and require ongoing inspection or monitoring.

The Texas Department of Agriculture explains that bait stations contain material termites feed on. When termites are detected, a treated bait can be used so the active material is transferred through feeding behavior.

The initial installation is therefore only part of the program. Homeowners comparing quotes should also ask about:

  • station monitoring;
  • service frequency;
  • bait replacement;
  • annual renewal;
  • retreatment provisions;
  • warranty coverage;
  • what happens if activity is detected.

Localized or Spot Treatment

A localized treatment may be appropriate in certain circumstances, but finding termites in one visible area does not necessarily establish that activity exists only there.

This is one reason proper inspection and species identification matter before choosing the least expensive treatment option.

Whole-Structure Fumigation

Fumigation is a substantially different service from treating subterranean termite activity around a foundation.

The Texas Department of Agriculture identifies spot treatment, fumigation and physical removal of infested wood as options for drywood termites and notes that treatment recommendations depend on the termite involved.

For North Texas homeowners, the important lesson is not to assume that seeing the word “termite” automatically means the house needs tenting.

The species and extent of the problem should be established first.


Why Can Two North Texas Homes Receive Very Different Termite Quotes?

Termite treatment is priced around the treatment scope, not simply the number of bedrooms or the home’s Zillow square footage.

Several factors can substantially change the amount of work required.

1. Termite Species

Subterranean and drywood termites live differently and can require different management strategies.

Texas A&M AgriLife provides specific guidance on subterranean termites and identifies Texas as a state with significant termite risk.

Subterranean termites typically maintain a relationship with soil and may reach a structure through concealed pathways. Drywood termites live within wood and do not require the same soil contact.

Correct identification comes before sensible pricing.

2. Size and Perimeter of the Home

A larger structure can require more material, more stations and more technician time.

But total square footage alone is not enough.

A house with multiple patios, attached garages, additions or complicated foundation lines may have a much longer or more difficult treatment perimeter than a simpler home of similar living area.

3. Foundation Type

Slab-on-grade, pier-and-beam and crawlspace construction can present different inspection and treatment conditions.

Access matters.

The technician needs to determine where termite activity is occurring and how the treatment can be applied according to the product label and treatment plan.

4. Extent of Termite Activity

Limited evidence near one accessible exterior location is a different situation from activity discovered in several parts of a structure.

More extensive activity may require a broader treatment strategy and additional follow-up.

5. Concrete and Other Access Barriers

Patios, driveways, porches and other construction adjoining a foundation can affect how accessible the treatment area is.

That can change both labor and application requirements.

6. Treatment Method

Liquid treatment, bait stations and other termite-management strategies have different material, installation and monitoring requirements.

The lowest initial quote is therefore not necessarily the lowest long-term cost.

Compare scope with scope, not simply price with price.

7. Monitoring and Warranty Coverage

Ask whether the quoted price covers only initial treatment or also includes inspections, monitoring, retreatment or other warranty provisions.

A low first-year price can look very different once annual monitoring or renewal costs are considered.


Do You Need Termite Treatment—or Just an Inspection?

Subterranean termite mud tube on the concrete foundation of a North Texas home
Mud tubes along a foundation can be a warning sign of subterranean termite activity and should be professionally investigated.

If you have not confirmed termites, inspection should generally come before choosing a treatment.

Termites can remain concealed in soil, wood and structural areas. EPA guidance notes that homeowners may not become aware of termites until they encounter a swarm or discover damage.

Signs worth investigating include:

  • mud-like shelter tubes along a foundation or wall;
  • discarded wings near doors or windows;
  • swarming insects indoors;
  • damaged or hollowed wood;
  • suspicious wood deterioration;
  • previous evidence of termite treatment;
  • visible activity around wood-to-soil contact.

Seeing one of these signs does not tell you how large the infestation is or what treatment it requires.

If you have found mud tubes, swarmers or suspicious wood damage around a Dallas-Fort Worth home, schedule a termite inspection before choosing a treatment based solely on an online price.


Termites vs. Flying Ants: Don’t Pay to Treat the Wrong Pest

Termite swarmers are frequently confused with winged ants.

The EPA specifically highlights the importance of distinguishing termite swarms from ant swarms.

A professional inspection can help determine:

  • whether the insect is actually a termite;
  • whether the evidence represents current or previous activity;
  • where activity is located;
  • whether conditions around the property are favorable to termites;
  • which treatment strategy fits the structure.

If you’re buying, selling or refinancing a home, the purpose may instead be a formal wood-destroying insect inspection, which is different from simply requesting an estimate for treatment.


DIY vs. Professional Termite Treatment

DIY prevention is useful. DIY treatment of an established structural termite infestation is a different matter.

Homeowners can take practical steps to reduce conducive conditions around a property, but effective structural termite treatment can require specialized inspection, application methods, equipment and knowledge of pesticide labels.

EPA guidance states that, in most cases, termiticide applications can only be properly performed by a trained pest-management professional.

Texas also regulates structural pest-control work. The Texas Department of Agriculture’s Structural Pest Control Service licenses and regulates professionals performing structural pest-control services.

Homeowners can help by:

  • repairing plumbing leaks;
  • correcting persistent moisture problems;
  • keeping unnecessary wood debris away from the structure;
  • avoiding conditions that conceal the foundation where practical;
  • correcting obvious wood-to-soil contact where appropriate;
  • monitoring for mud tubes and swarmers;
  • keeping gutters and drainage functioning properly;
  • arranging an inspection when suspicious activity appears.

Professional help becomes particularly important when:

  • live termites are confirmed;
  • mud tubes are entering the structure;
  • swarmers appear indoors;
  • structural wood appears damaged;
  • termite activity occurs in multiple areas;
  • previous treatment has apparently failed;
  • a real-estate inspection identifies wood-destroying insect activity;
  • pesticide application to the structure or soil is required.

What Does Professional Termite Service Include?

Pest control technician inspecting a Dallas-Fort Worth home for termite activity
A professional inspection helps identify termite activity, affected areas, property conditions, and the appropriate treatment scope.

The exact process depends on the property and proposed treatment, but a professional termite evaluation should establish the problem before treatment begins.

A typical process may involve:

1. Property Inspection

The technician looks for termite evidence, potential access routes, previous treatment and conditions that could contribute to activity.

2. Pest Identification

Treatment should be based on what is actually present rather than assuming all wood damage is caused by the same organism.

3. Treatment-Scope Development

The technician determines where treatment is required and which method fits the structure and infestation.

4. Proposal and Disclosure

Texas has specific consumer-disclosure requirements for termite treatment proposals.

5. Treatment

Treatment is performed according to the selected method and applicable pesticide label.

6. Monitoring or Follow-Up

Depending on the system and contract, additional monitoring, inspections or retreatment provisions may apply.

Homeowners who want ongoing termite protection rather than simply comparing treatment prices can explore Supremacy Services’ Termite Vault Security in Dallas, which combines termite-focused perimeter protection with ongoing monitoring.


What Should Be Included in a Texas Termite Treatment Quote?

This is one of the most important questions to ask when comparing termite companies.

The Texas Department of Agriculture states that when a termite treatment estimate or proposal is submitted to a consumer, the pest-control company must provide written disclosure information that includes:

  • a detailed diagram showing treatment areas;
  • approximate perimeter measurement;
  • areas of active or previous termite activity;
  • warranty or guarantee terms;
  • the chemical label;
  • the concentration of liquid termiticide being proposed or the minimum number of baiting systems being installed.

That information makes it possible to compare proposals more intelligently.

Don’t compare only the final dollar amount.

Instead, ask:

QuestionWhy it matters
What termite species was identified?Different termites can require different strategies
Where was activity found?Establishes treatment scope
Is this spot or whole-perimeter treatment?Prevents misleading price comparisons
What treatment method is proposed?Liquid and bait programs work differently
How many bait stations are included?Helps compare bait-system proposals
What areas will receive liquid treatment?Clarifies actual coverage
Is monitoring included?Can affect long-term cost
Are follow-up visits included?Clarifies total service scope
What does the warranty cover?Coverage varies
Is annual renewal required?Important for long-term budgeting
Are repairs included?Treatment and structural repair are different expenses

A $500 proposal and a $1,500 proposal may not actually be competing versions of the same service.


Termite Treatment Cost vs. Termite Damage Repair

Termite treatment and termite damage repair are separate expenses unless the contract specifically says otherwise.

Treatment addresses the termite problem.

Repair addresses damaged framing, trim, drywall, flooring or other building components after the extent of damage has been determined.

Do not assume the termite company’s treatment price automatically includes construction work.

Likewise, visible wood damage alone does not establish how much structural repair is necessary. Significant structural concerns should be evaluated by the appropriate qualified professional.

This distinction is especially important when comparing quotes after discovering termites during a home sale.


What About a WDI Inspection During a Home Purchase?

A wood-destroying insect (WDI) inspection is not the same product as routine termite treatment.

The purpose of the inspection is to identify evidence associated with termites and other relevant wood-destroying organisms and document the findings.

Supremacy Services maintains a separate Real Estate WDI Inspections DFW service for homeowners, buyers, sellers and real-estate transactions.

Keeping these services separate is important:

Suspect termites at your existing home? Start with termite evaluation.

Buying or selling a property? You may need the appropriate WDI inspection/report.


Are Termites a Serious Concern in North Texas?

Yes. Texas A&M AgriLife identifies Texas as one of the states at significant risk for termite infestation and provides dedicated guidance for subterranean termites.

But local SEO should not turn that fact into the claim that every North Texas home has the same termite risk.

Risk varies with the individual property.

Conditions technicians may consider include:

  • moisture around the foundation;
  • drainage problems;
  • wood-to-soil contact;
  • previous termite activity;
  • construction details;
  • inaccessible foundation areas;
  • dead wood or cellulose materials around the property.

The correct treatment decision should therefore be based on the home itself rather than the ZIP code alone.


How Can North Texas Homeowners Reduce Termite Risk?

Termite prevention measures around a North Texas home including drainage, wood storage and monitoring
Moisture control, proper drainage, reduced wood-to-soil contact, and routine monitoring can help reduce termite-friendly conditions around a home.

Termite prevention focuses on making the structure less accessible or attractive to termite activity while maintaining appropriate professional protection where necessary.

Termite Prevention Checklist

  • Repair leaking plumbing.
  • Correct persistent moisture around the structure.
  • Keep drainage systems functioning.
  • Remove unnecessary wood debris near the foundation.
  • Avoid storing firewood directly against the home.
  • Investigate unexplained mud tubes.
  • Watch for discarded wings after swarming activity.
  • Address damaged or deteriorated wood.
  • Avoid disturbing known termite evidence before an inspection.
  • Keep records of previous termite treatments.
  • Review warranty and monitoring requirements after treatment.

EPA also describes physical barriers, building materials treated with termiticides, wood treatments, soil-applied termiticides and termite baits among termite-management approaches.


How to Compare Termite Treatment Companies in Dallas-Fort Worth

The cheapest number on a proposal tells you very little unless you know what it buys.

Compare these five things first:

1. Inspection findings

The company should be able to explain what evidence it found and where.

2. Proposed treatment

Understand whether the proposal involves liquid treatment, bait stations, localized treatment or another approach.

3. Coverage

Determine exactly which areas of the property are being treated.

4. Follow-up

Find out whether monitoring and return visits are included.

5. Warranty

Read the actual warranty conditions rather than relying on a verbal description.

Texas specifically advises consumers to review termite disclosure information, pesticide labels and warranty information when comparing proposals.


Is the Cheapest Termite Treatment a Good Deal?

Not necessarily.

A lower price may be entirely appropriate if the required scope is smaller. But it may also represent a different treatment method, less coverage or different monitoring and warranty provisions.

Instead of asking:

“Which company is cheapest?”

ask:

“What exactly is each company proposing to treat, how will it be treated, what follow-up is included and what protection remains afterward?”

That creates a meaningful comparison.


How Much Should You Budget for Termite Treatment in DFW?

For early budgeting, think in ranges rather than one number.

Current third-party Dallas data places many treatments in the hundreds of dollars, while larger or more complicated termite projects can reach into the thousands.

The most reliable way to turn that broad range into an actual number is:

Inspection → termite identification → treatment scope → written proposal.

Anything before that is an estimate.


Frequently Asked Questions

How much does termite treatment cost in Dallas?

Angi’s Dallas 2026 pricing guide reports an average of approximately $615 and a typical range of about $281–$949, with one-time treatments ranging more broadly depending on the project. These are third-party market estimates rather than Supremacy Services prices.

Why is termite treatment so expensive?

Termite treatment may require extensive inspection, specialized materials, treatment around the foundation, drilling or trenching where appropriate, bait-station installation and subsequent monitoring. Larger or harder-to-access structures can require more labor and materials.

Is termite treatment priced by square foot?

Sometimes square footage contributes to the estimate, but it is not the only measurement. Foundation perimeter, treatment method, accessibility, infestation location and required monitoring can be equally important.

Are termite bait stations cheaper than liquid treatment?

Not universally. Bait systems and liquid treatments have different installation, material and monitoring requirements. Compare the complete initial and ongoing costs rather than the first invoice alone.

Can I treat termites myself?

Homeowners can perform valuable prevention and maintenance, but treating an established structural infestation is different. EPA notes that most termiticide applications are best handled by trained pest-management professionals, and Texas regulates structural pest-control services.

How do I know if I have termites?

Possible signs include mud tubes, discarded wings, swarmers and damaged or hollow wood. Because termites can remain concealed, suspicious evidence should be professionally evaluated before selecting treatment.

Do I need to tent my house for termites?

Not automatically. Treatment depends on the termite species and circumstances. Subterranean termite management commonly uses approaches such as soil treatments or bait systems, while fumigation may be considered for certain drywood termite situations.

What should a Texas termite proposal include?

Texas requires specified disclosure information, including a treatment diagram, approximate perimeter measurement, identified activity areas, warranty terms, chemical label and information about the proposed liquid concentration or minimum number of bait stations.

Should I get multiple termite estimates?

Comparing proposals can be useful, particularly for substantial treatment. Compare the inspection findings, treatment areas, method, monitoring and warranty—not simply the bottom-line price.


Get a Termite Assessment in Dallas-Fort Worth

Online termite-treatment prices are useful for setting expectations, but they cannot show how termites are entering your particular home, how much of the structure requires treatment or which treatment strategy fits the property.

If you’ve discovered mud tubes, swarmers, suspicious wood damage or previous termite activity, Supremacy Services can evaluate the property and recommend an appropriate termite-control strategy.

Explore Termite Vault Security in Dallas or request a termite assessment from Supremacy Services to get a property-specific treatment plan and quote.

For Dallas-Fort Worth homeowners, that inspection-based number is far more useful than relying on a national average.

Spider web near the exterior of a North Texas home at dusk

What Attracts Spiders to North Texas Homes? 8 Common Causes

Spiders are usually attracted to North Texas homes for one main reason: the property gives them access to food and shelter. A steady supply of insects, outdoor lighting that concentrates prey, protected corners, clutter, vegetation near the structure, moisture and easy entry points can all make a home more favorable to spiders.

That does not necessarily mean your house is dirty or that every spider sighting indicates an infestation. Spiders are predators, and many species are beneficial outdoors because they feed on insects. But when you repeatedly find spiders, fresh webs or egg sacs around your Dallas-Fort Worth home, it is worth looking at what is supporting the activity, rather than only removing the spiders you can see.

Table of Contents

  1. What attracts spiders to a house?
  2. Other insects—the biggest attraction
  3. Outdoor lighting
  4. Protected hiding and web-building areas
  5. Clutter and stored materials
  6. Moisture and damp areas
  7. Landscaping close to the house
  8. Cracks, gaps and other entry points
  9. Seasonal and environmental changes
  10. Where should you look for spider activity?
  11. How to make your home less attractive to spiders
  12. DIY vs. professional spider control
  13. When to consider professional service
  14. FAQs

What Attracts Spiders to a House?

Spiders are primarily attracted to places where they can find prey and suitable shelter. Around a home, that often means insects gathering near lights, protected eaves and corners, garages and storage areas, vegetation near the structure, and openings that provide access indoors.

Think of a spider problem less as a single-pest problem and more as a small ecosystem.

If moths, flies, mosquitoes and other insects regularly gather around a porch light, a web-building spider has both a feeding opportunity and a convenient place to construct a web. If a garage has abundant insects plus stacks of undisturbed boxes, hunting and hiding spiders may find favorable conditions there as well.

Here are eight conditions worth checking around a North Texas home.

1. Other Insects—the Biggest Attraction

Spiders go where their prey is

Spiders do not enter a house because they want human food in the same way ants or cockroaches might. They are predators.

A property supporting plenty of insects can consequently support spiders that feed on those insects.

Common prey can include:

  • flies;
  • moths;
  • mosquitoes;
  • gnats;
  • small crawling insects; and
  • other arthropods.

This is why repeatedly killing individual spiders may have limited long-term impact. If the underlying insect activity remains unchanged, the property can continue to provide feeding opportunities.

A spider problem can therefore be an insect problem

Look beyond the spider itself.

Are insects gathering around exterior lights every evening? Are flies active around garbage containers? Are small insects appearing near windows? Is there substantial pest activity around landscaping?

Those clues can help explain why spiders repeatedly occupy the same areas.

If spiders and other insects are repeatedly appearing around your property, learn how professional [spider control in Dallas-Fort Worth] can address both active spider areas and the conditions supporting them.

2. Outdoor Lighting

Insects gathering around an outdoor light near a spider web on a North Texas home
Outdoor lighting can draw flying insects, creating feeding opportunities for spiders around porches and entryways.

Porch and exterior lights can indirectly attract spiders

Light itself is not necessarily what the spider wants—the insects gathering around the light are the important part.

Exterior lights can concentrate flying insects around doors, windows, patios, garages and eaves. Those locations can then become productive hunting areas for spiders.

Texas A&M AgriLife Extension recommends directing outdoor lighting away from doorways where practical, switching lights off when they are unnecessary and considering yellow “bug” lights that attract fewer insects.

Check spider activity around:

LocationWhy it may become active
Porch lightsFlying insects congregate nearby
Garage lightsInsects plus sheltered building edges
Patio lightingPrey can concentrate around outdoor living areas
Windows near lightsInsects may collect around illuminated glass
Eaves above fixturesProtected locations for webs
Entry doorsLight, insects and structural gaps can occur together

If most of your exterior webs are concentrated around lighting, reducing the insects gathering there may be more useful than repeatedly sweeping down the same webs without addressing the attraction.

3. Protected Hiding and Web-Building Areas

Spider webs around eaves and exterior corners of a North Texas house
Eaves, soffits, window frames and other protected exterior corners can provide undisturbed areas for spiders.

Spiders generally benefit from locations that give them protection and access to prey.

Around North Texas homes, these can include:

  • eaves;
  • soffits;
  • porch ceilings;
  • window frames;
  • garage corners;
  • sheds;
  • outdoor furniture;
  • utility areas;
  • attics;
  • closets; and
  • other low-disturbance spaces.

Different spiders behave differently. Some construct webs and wait for prey, while others actively hunt.

That distinction helps explain why you may find one spider repeatedly building webs near an exterior light while another is encountered moving across a garage floor.

Why undisturbed areas matter

A protected corner that is rarely cleaned or disturbed can provide somewhere to remain concealed, build a web or leave an egg sac.

This is one reason regular web removal can be useful as part of spider management. Removing webs and egg cases physically disrupts favorable spider sites instead of simply waiting for activity to increase.

4. Clutter and Stored Materials

Clutter creates more hiding opportunities

Cluttered and organized garage showing potential spider hiding places
Cardboard boxes and undisturbed storage can provide sheltered hiding areas, while better organization makes inspection and cleaning easier.

Cardboard boxes, stored equipment, unused furniture, firewood and piles of materials create numerous protected spaces.

Garages, sheds, attics and storage rooms deserve particular attention.

Instead of leaving numerous open cardboard boxes on a garage floor, consider:

  • reducing unnecessary storage;
  • keeping frequently used storage areas organized;
  • sealing cardboard boxes securely;
  • using tightly closing plastic storage containers where appropriate;
  • keeping items off walls when practical so areas can be inspected; and
  • checking stored items before carrying them into living spaces.

Texas A&M specifically recommends reducing clutter and sealing stored cardboard boxes, noting that tight-fitting plastic containers can also help exclude spiders.

Be especially careful when reaching into long-undisturbed storage areas. If you cannot identify a spider, avoid handling it directly.

5. Moisture and Damp Areas

Moisture can support the insects spiders hunt

A spider is not necessarily appearing beside a plumbing leak because it is directly seeking water.

The relationship can be indirect.

Damp environments can support certain insects and other arthropods, creating potential feeding opportunities for spiders. EPA pest-prevention guidance recommends eliminating pest access to food, water and shelter and repairing plumbing leaks as part of an integrated approach.

Investigate areas such as:

  • beneath sinks;
  • around leaking outdoor faucets;
  • poorly drained areas;
  • damp garages or utility spaces;
  • irrigation overspray;
  • plant trays;
  • clogged or wet drainage areas; and
  • locations where moisture-loving insects are abundant.

If spider activity is concentrated in one damp part of the house, do not stop at the spider. Look for the moisture source and the other pest activity it may be supporting.

6. Landscaping Close to the House

Dense vegetation can create a bridge between outdoor habitat and your home

Shrubs, tree branches and other vegetation immediately against a structure can create sheltered areas and bring outdoor arthropod activity close to windows, eaves and siding.

Texas A&M recommends pruning shrubs and trees that touch the house as part of spider prevention.

Pay particular attention to:

  • branches touching the roof;
  • shrubs pressed against exterior walls;
  • dense vegetation around windows;
  • groundcover immediately beside the foundation;
  • stored firewood beside the house; and
  • outdoor materials that remain undisturbed for long periods.

The objective is not to eliminate landscaping. It is to reduce unnecessary contact and hiding areas immediately against the structure.

7. Cracks, Gaps and Other Entry Points

Supremacy Services technician inspecting gaps around a door, window and utility entry points
Gaps around doors, windows and utility penetrations are important areas to check when trying to reduce spider entry.

Spiders can exploit the same openings used by other small pests

Even if most spider activity begins outdoors, gaps around a house can make indoor encounters more likely.

Inspect:

  • door sweeps;
  • weather stripping;
  • window screens;
  • gaps around window and door frames;
  • utility penetrations;
  • cracks and crevices;
  • garage-door edges; and
  • other openings between exterior and interior spaces.

Texas A&M recommends repairing weather stripping around doors and windows and sealing gaps around lighted doors and windows where insects—and the spiders feeding on them—can gather.

EPA likewise recommends exclusion as part of home pest prevention.

This produces a double benefit: sealing openings can reduce spider entry while also reducing access for some of the insects spiders prey on.

8. Seasonal and Environmental Changes

A sudden spider sighting does not automatically mean a spider infestation

Outdoor conditions and prey availability change throughout the year.

Temperature, rainfall, landscaping conditions and insect activity can influence what homeowners notice around a property. Spiders that normally remain unnoticed outdoors may also wander into garages or homes.

For Dallas-Fort Worth homeowners, the better question is therefore not simply, “What month is spider season?”

Ask instead:

What changed around my property?

For example:

  • Has insect activity increased around the lights?
  • Has vegetation grown against the house?
  • Have boxes recently been moved from storage?
  • Is a door sweep damaged?
  • Have new webs appeared around the same exterior areas?
  • Is moisture or irrigation creating increased pest activity?
  • Are spiders appearing occasionally, or repeatedly in several rooms?

Those observations are more useful for determining whether you are dealing with an occasional wanderer or conditions that are continually supporting spider activity.

Where Should You Look for Spider Activity?

Use this quick inspection checklist:

AreaWhat to look for
Exterior lightsInsects, fresh webs and spiders
Eaves and soffitsWebbing and egg sacs
Window framesWebs, insects and gaps
Door framesGaps, damaged weather stripping
GarageSpiders, clutter and insect activity
Attic/storageUndisturbed boxes and sheltered corners
Patio/porchWebs around lights and furniture
LandscapingVegetation contacting the structure
Plumbing/moist areasLeaks plus insect activity
Shed/firewoodProtected hiding spaces

Finding a spider does not mean every item on this list is a problem. Look for patterns.

Several spiders repeatedly appearing around one window, for example, should prompt you to inspect the window, nearby lighting, insect activity and possible gaps together.

How to Make Your Home Less Attractive to Spiders

The most useful spider-prevention strategy is to reduce food, shelter and access rather than depending on one tactic.

Step 1: Reduce the insects spiders feed on

Investigate why flies, moths, gnats or other insects are abundant around the property.

Pay particular attention to exterior lights, waste areas, standing water and moisture problems.

Step 2: Modify unnecessary exterior lighting

Turn off lights when they are not needed and, where practical, position lighting so insects are not concentrated immediately beside doors and windows.

Step 3: Remove webs and egg sacs

Regular physical removal can disrupt web-building areas.

A vacuum can be useful indoors. For high exterior areas, use an appropriate long-handled web-removal tool rather than taking unnecessary risks on ladders.

Step 4: Reduce clutter

Organize garages, sheds, closets and storage areas.

Seal stored materials and avoid creating long-undisturbed piles.

Step 5: Seal entry points

Repair damaged screens and weather stripping. Inspect gaps around doors, windows and penetrations.

Step 6: Manage vegetation next to the structure

Trim vegetation contacting the house and move firewood or construction materials away from exterior walls.

Step 7: Correct unnecessary moisture

Repair leaks and investigate areas that remain persistently damp.

Step 8: Monitor what happens next

Spider management should be based on what you observe.

EPA’s integrated pest management approach emphasizes monitoring and correct identification before deciding what control action is appropriate.


DIY vs. Professional Spider Control

Supremacy Services technician inspecting roof eaves for spider activity at a DFW home
A professional inspection can identify spider activity, web-building areas, entry points and conditions around the home’s exterior.

Many occasional spider problems can initially be addressed through sanitation, exclusion and physical removal.

DIY may be reasonable when…Professional inspection may be useful when…
You occasionally see one spiderSpiders repeatedly appear indoors
Activity is limited to a few exterior websNew webs return quickly after removal
Entry gaps are obvious and easy to correctYou cannot determine where activity originates
Clutter can be easily removedEgg sacs are appearing in multiple locations
Webs can be safely reachedActivity is occurring in difficult-to-access areas
There is no indication of a potentially medically significant spiderYou suspect black widow or brown recluse activity
Insect activity is minorHeavy insect activity is also present

Be cautious with DIY pesticide use

More pesticide is not necessarily better spider management.

Texas A&M notes that sanitation and physical removal are important spider-management methods and advises homeowners to use only pesticide products labeled for the intended pest and location and to follow label directions.

EPA’s IPM guidance similarly favors combining prevention, monitoring and appropriate control methods instead of treating pesticide application as the only solution.


If web removal, exclusion and insect reduction are not stopping recurring activity, Supremacy Services can inspect the property and identify where spiders and their prey are concentrating. Explore our [DFW spider control service].

What Does Professional Spider Control Typically Address?

A professional spider-management visit should look beyond the spider sitting in plain view.

Depending on the property and activity, an inspection may evaluate:

  1. where spiders and webs are concentrated;
  2. likely harborage areas;
  3. egg sacs and recurring web sites;
  4. exterior insect activity;
  5. doors, windows and other potential entry points;
  6. eaves, soffits and roofline areas;
  7. garages, patios and storage areas;
  8. landscaping or environmental conditions supporting activity; and
  9. whether targeted treatment or broader pest management is appropriate.

In Texas, businesses and individuals performing structural pest control for compensation are subject to licensing requirements administered by the Texas Department of Agriculture’s Structural Pest Control Service.

Ask what the technician found, what conditions appear to be supporting the activity and what you can change around the property to help reduce recurrence.

What About Black Widows and Brown Recluse Spiders?

Most spider encounters should not automatically be treated as dangerous-spider encounters.

However, Texas homeowners should know that medically important spiders occur in the state. Identification matters because harmless spiders are frequently mistaken for species of concern.

Do not rely only on size or color to identify an unfamiliar spider.

If you repeatedly find spiders you suspect may be black widows or brown recluses, particularly around sheltered storage areas, garages or other low-disturbance locations, avoid handling them directly and consider obtaining a reliable identification.

Texas A&M AgriLife Extension provides Texas-specific spider identification and management information.

Does Seeing Spiders Mean Your House Is Dirty?

No. Seeing spiders does not automatically mean a home is dirty.

A clean home can still provide spiders with prey, access and protected locations. Outdoor lights, gaps around doors, landscaping, garages and normal insect activity can all contribute.

Cleaning and decluttering help because they reduce hiding places and make inspection easier—not because spiders are proof of poor housekeeping.


Frequently Asked Questions

What attracts spiders to your house the most?

A reliable supply of insect prey is one of the most important factors. Protected hiding or web-building locations and easy access into the structure can make a property even more favorable.

Does leaving the porch light on attract spiders?

It can contribute indirectly. Exterior lights attract many flying insects, creating feeding opportunities for spiders. Texas A&M recommends directing unnecessary lighting away from doorways and turning it off when it is not needed.

Are spiders attracted to moisture?

Moist areas can indirectly support spider activity by supporting insects and other arthropods that spiders eat. Investigate leaks or persistent dampness when spider and insect activity occur together.

Why are there spiders around my windows?

Windows can combine several favorable conditions: nearby exterior lighting, insects attracted to the glass or lights, protected frame edges and small structural gaps.

Does clutter attract spiders?

Clutter creates sheltered, low-disturbance hiding places. Reducing unnecessary boxes and stored materials makes those areas easier to inspect and less favorable for concealed activity.

Why do I keep finding spiders in my garage?

Garages can provide easy exterior access, insects, sheltered corners and stored materials. Inspect door seals, boxes, lighting and insect activity rather than focusing only on the spider itself.

Will removing spider webs get rid of spiders?

Web removal helps disrupt activity and can remove egg sacs, but recurring webs suggest that favorable conditions remain. Look for prey, shelter and nearby harborage as well.

Should I spray every spider I see?

Not necessarily. Occasional spiders can often be physically removed. EPA recommends an integrated pest-management approach based on identification, monitoring, prevention and appropriate control rather than unnecessary pesticide use.

How can I prevent spiders from entering my house?

Repair screens and weather stripping, seal gaps, reduce insects around entrances, manage exterior lighting, remove clutter and keep vegetation from contacting the structure.

When should I call pest control for spiders?

Consider professional help when spiders or webs repeatedly return, multiple spiders are appearing indoors, egg sacs are common, the source cannot be identified, insect activity is substantial, or you suspect medically significant spiders.


Reduce What Is Attracting the Spiders—not Just the Spider You See

Finding a spider in your Dallas-Fort Worth home does not necessarily mean you need an immediate treatment.

But recurring spiders usually deserve a closer look at the environment around the house.

Start with the fundamentals: prey, shelter and access.

Reduce insect activity. Reconsider lighting around entrances. Remove webs and clutter. Repair screens and weather stripping. Trim vegetation away from the structure. Correct moisture problems and monitor where activity returns.

If spiders continue appearing despite those changes, the next step is identifying the locations and conditions that are keeping the property attractive.

Final CTA:
Seeing recurring spiders, webs or egg sacs around your North Texas home? [Schedule a spider-control inspection with Supremacy Services] to identify active areas, entry points and the pest activity helping spiders stay established.

Supremacy Services technician inspecting a mattress seam for signs of bed bugs in a Dallas home.

What Are the Signs of Bed Bugs Besides Bites?

Bed bug bites are not the most reliable way to determine whether bed bugs are in your home. Signs of bed bugs besides bites include dark fecal spots, rusty or reddish stains on bedding, shed skins, tiny eggs or eggshells, live bugs and, in heavier infestations, a noticeable musty odor.

That distinction matters for Dallas and DFW homeowners because bite reactions vary significantly. Some people develop itchy marks while others may show no visible reaction. The EPA specifically describes bites as a poor indicator of a bed bug infestation and recommends looking for physical evidence instead.

If you suspect bed bugs, concentrate your inspection around the mattress, box spring, bed frame and headboard before expanding outward to nearby furniture and cracks.

Table of Contents

  1. What Are the Most Reliable Signs of Bed Bugs Besides Bites?
  2. Dark or Black Fecal Spots
  3. Rusty or Reddish Stains on Bedding
  4. Shed Bed Bug Skins
  5. Tiny Bed Bug Eggs and Eggshells
  6. Live Bed Bugs
  7. A Sweet or Musty Odor
  8. Evidence in Mattress and Furniture Crevices
  9. Where Should You Look for Bed Bugs?
  10. Can You Have Bed Bugs Without Seeing Bites?
  11. What Can Be Mistaken for Bed Bugs?
  12. What Should You Do If You Find Signs?
  13. DIY Inspection vs. Professional Inspection
  14. How Professional Bed Bug Treatment Works
  15. How to Reduce the Risk of Bringing Bed Bugs Home
  16. Frequently Asked Questions

What Are the Most Reliable Signs of Bed Bugs Besides Bites?

Close-up comparison of bed bug fecal spots, rusty stains and shed skins on bedding and mattress fabric.
Dark fecal spots, reddish stains and shed skins are physical clues that can indicate bed bug activity.

The strongest evidence of bed bugs is physical evidence of the insects themselves or the traces they leave where they hide.

Look for:

SignWhat to look forCommon locations
Fecal spotsTiny dark brown or black marksMattress seams, bed frames, headboards
Rust-colored stainsSmall reddish or rusty marksSheets, pillowcases, mattress surfaces
Shed skinsPale, empty bug-shaped shellsMattress seams, cracks, furniture
Eggs or eggshellsTiny pale or whitish objectsProtected seams and crevices
Live bugsFlat, oval insects; adults are reddish-brownMattress piping, box springs, frames
Musty odorUnusual sweet/musty smell, generally associated with heavier activitySleeping areas and infested furniture
Clusters of evidenceSeveral of the above signs togetherEstablished hiding areas

Finding one suspicious mark does not automatically prove that you have bed bugs. Finding a live specimen or several characteristic signs in the same hiding area is much stronger evidence.

The EPA recommends physical inspection because skin reactions alone can resemble mosquito bites, flea bites, rashes, eczema and other conditions.

1. Dark or Black Fecal Spots

Tiny dark spots around mattress seams and other hiding places can be bed bug excrement.

The EPA describes these spots as dark marks that may bleed into fabric in a manner similar to ink from a marker.

Pay particular attention to concentrated spotting around:

  • mattress seams and piping;
  • mattress labels and stitching;
  • box-spring edges;
  • joints in the bed frame;
  • cracks around the headboard;
  • upholstered furniture seams.

A random dark speck is not enough to diagnose an infestation. Look for repeated spotting or additional evidence such as cast skins, eggs or live insects.

Do bed bug fecal spots wipe away?

Appearance varies according to the surface. On absorbent materials, fecal material may soak into the fibers rather than behaving like ordinary loose dirt. Avoid relying on a single “wipe test” to identify an infestation.

Instead, inspect the surrounding crevices carefully.

2. Rusty or Reddish Stains on Bedding

Small rusty or reddish stains on sheets or mattresses are another recognized sign of possible bed bug activity.

According to the EPA, these marks can occur when bed bugs are crushed.

Check light-colored bedding especially carefully when changing your sheets. Examine:

  • fitted sheets;
  • mattress protectors;
  • pillowcases;
  • mattress seams;
  • areas where bedding contacts the bed frame.

Blood-colored stains can have many causes, so they should be treated as a reason to inspect—not proof by themselves.

If unexplained stains repeatedly appear together with dark spotting or insect evidence, a more thorough bed bug inspection is appropriate.

3. Shed Bed Bug Skins

Bed bugs shed their outer skins as immature bugs develop, so empty exoskeletons can indicate that bed bugs have been living and developing nearby.

Young bed bugs, called nymphs, pass through multiple developmental stages before becoming adults.

Their cast skins can look like pale, translucent or yellowish versions of a bed bug.

Because these skins do not move, homeowners sometimes mistake them for dried insects, crumbs or debris.

Look for them inside protected areas such as mattress folds, box-spring crevices, bed-frame joints and behind headboards.

Finding several cast skins concentrated in one area is more concerning than finding a single unidentified fragment.

4. Tiny Bed Bug Eggs and Eggshells

Visual comparison of bed bug eggs, pale nymphs and reddish-brown adult bed bugs on mattress fabric.
Bed bug eggs and young nymphs are much smaller and harder to identify than mature adults.

Bed bug eggs are extremely small and can be difficult to spot without careful inspection.

The EPA describes bed bug eggs as approximately 1 millimeter in size. They are pale and are typically found in protected hiding places.

Potential locations include:

  • mattress and box-spring seams;
  • cracks in bed frames;
  • furniture joints;
  • narrow crevices close to sleeping areas.

Their small size makes visual identification difficult.

Do not assume every white speck on your mattress is a bed bug egg. Fabric fibers, dust and other household debris can look similar to an untrained eye.

When eggs occur alongside fecal spotting, cast skins or live insects, however, the evidence becomes much stronger.

5. Live Bed Bugs

Finding and correctly identifying a live bed bug is one of the clearest ways to confirm an infestation.

Adult bed bugs are small, flat, wingless and reddish-brown. Younger nymphs are smaller and can be much paler.

Bed bugs’ flattened bodies allow them to hide in remarkably narrow spaces.

Start by examining the areas closest to where people sleep rather than searching randomly throughout the entire house.

What do bed bugs look like?

Adult bed bugs have:

  • a flattened, oval body;
  • six legs;
  • no functional wings;
  • a reddish-brown appearance;
  • a body shape that becomes more swollen after feeding.

If you capture a suspicious insect, keep it in a sealed container or clear bag if this can be done safely. A pest professional can often identify a specimen more reliably than identification based on a skin reaction or internet photo alone.

6. A Sweet or Musty Odor

A noticeable sweet or musty odor can occur with bed bug infestations, particularly when activity is substantial.

The CDC includes a sweet, musty odor among signs that may accompany an infestation.

Odor alone, however, is not a reliable diagnostic test.

Bedrooms can develop unusual smells from humidity, laundry, mattresses, pets, mold and many other sources.

Treat odor as supporting evidence rather than confirmation. If it occurs together with spotting, cast skins or live insects, inspect the area more closely.

7. Evidence in Mattress and Furniture Crevices

Sometimes the most important sign is not a single object but a concentration of bed bug evidence in a protected hiding place.

Bed bugs generally remain close to areas where people rest and sleep.

That makes mattress seams, box springs, bed frames and headboards logical places to begin an inspection.

As infestations become more established, evidence may also occur in nearby upholstered furniture, drawers, curtains, cracks and other sheltered spaces.


Where Should You Look for Bed Bugs?

Bedroom inspection diagram highlighting bed bug hiding places around mattress seams, bedding, box spring, headboard and bed frame.
Start your inspection around the bed, paying close attention to seams, joints, cracks and other protected hiding places.

Start with the bed and gradually work outward.

The EPA identifies mattress seams and tags, box springs, bed frames and headboards as important inspection areas. With heavier infestations, bed bugs may also be found in chairs, couches, drawer joints, curtains and other cracks and crevices.

A practical bed bug inspection checklist

Use a bright flashlight and inspect systematically.

1. Remove the bedding

Check sheets and pillowcases for unexplained reddish stains or dark spotting.

2. Inspect the mattress

Pay close attention to seams, piping, labels, stitching, handles and folds.

3. Examine the box spring

Look along edges, seams, corners and protected structural areas.

4. Check the bed frame

Inspect screw holes, joints, cracks and areas where different materials meet.

5. Inspect the headboard

Look behind it as well as around brackets and mounting points.

6. Move to nearby furniture

Check nightstands, upholstered chairs and couches—especially seams and joints.

7. Document suspicious evidence

Take clear photographs or preserve a suspected insect for professional identification when practical.

Avoid immediately carrying suspected infested furniture through the house. Moving belongings without a plan can potentially relocate hidden insects.

Can You Have Bed Bugs Without Seeing Bites?

Yes. The absence of visible bites does not rule out bed bugs.

People respond differently to bed bug bites, and the CDC notes that reactions can range from no physical signs to noticeable marks. Bite marks may also take time to become visible.

That is why checking the home for physical evidence is more useful than asking whether everyone in the household has been bitten.

One person in a household may develop obvious marks while another person may show little or no visible reaction.

Conversely, unexplained itchy marks do not automatically prove bed bugs are responsible.

What Can Be Mistaken for Bed Bugs?

Comparison of a bed bug, carpet beetle, booklouse and cockroach nymph to help distinguish similar household pests.
Several household insects can be mistaken for bed bugs, making correct identification important before treatment.

Carpet beetles and other small household insects can be mistaken for bed bugs, while skin reactions from other insects or dermatological conditions can be mistaken for bed bug bites.

The EPA specifically warns that incorrect identification can delay effective treatment.

Bed bugs vs. other possible problems

What you noticeBed bugs may be possibleOther explanations can include
Itchy skin marksYesMosquitoes, fleas, other arthropods or skin conditions
Tiny insect near bedYesCarpet beetles or other household insects
Dark mattress spotsYesDirt, mold or unrelated stains
Red marks on sheetsYesOther sources of blood or fabric staining
Small pale debrisEggs or shed skins are possibleDust, lint or fabric particles
Musty bedroom smellPossible with infestationHumidity, mold, laundry or other household sources

Texas A&M AgriLife emphasizes that many arthropod bites can look similar and that confirmation of bed bugs should be based on finding and identifying the insect rather than diagnosing the pest from a bite alone.

What Should You Do If You Find Signs?

If you discover convincing bed bug evidence, the next priority is confirmation and containment—not panic-driven disposal of your belongings.

1. Preserve evidence

If possible, photograph the evidence or safely capture a specimen for identification.

2. Avoid moving items between rooms

Moving bedding, furniture, clothing or other belongings from a suspected room to an unaffected area can make inspection and treatment more complicated.

3. Reduce unnecessary clutter

Clutter provides additional hiding places and makes inspection harder. Do not randomly distribute items elsewhere in the home while decluttering.

4. Arrange a professional inspection when evidence is convincing

Bed bugs can occupy extremely small spaces and low-level infestations can be difficult to locate.

If you have found dark spotting, cast skins, eggs or a suspicious insect around your bed, schedule a professional bed bug inspection in Dallas/DFW before the problem has more time to spread.

DIY Inspection vs. Professional Inspection

Supremacy Services pest control technician inspecting a bed frame and mattress for bed bug activity.
A professional bed bug inspection can help confirm suspicious evidence and identify where activity is occurring.

A careful homeowner can identify obvious bed bug evidence, but finding every hiding area is considerably more difficult.

DIY inspectionProfessional inspection
Useful for initial screeningUseful when evidence is uncertain or activity persists
Low costInvolves professional service
Can identify obvious bugs or stainsTechnician can examine likely harborages systematically
Easy to miss small or hidden populationsExperience helps distinguish bed bugs from look-alike pests
Does not itself eliminate an infestationCan lead directly to an appropriate treatment plan

DIY inspection is most useful for answering, “Do I see anything suspicious?”

Professional inspection becomes more valuable when the question is, “Is this actually a bed bug infestation, where is the activity located, and what treatment is appropriate?”

When Is Professional Bed Bug Service Appropriate?

Consider professional help when:

  • you find a live suspected bed bug;
  • you repeatedly find fecal spotting or cast skins;
  • evidence appears in more than one sleeping area;
  • activity continues despite DIY measures;
  • you cannot confidently identify the insect;
  • bed bugs may have spread into upholstered furniture;
  • the infestation involves an apartment, rental or other multi-unit environment;
  • you need an appropriate treatment plan rather than continued inspection.

In Texas, structural pest-control businesses and professionals performing regulated pest-control work are subject to licensing requirements administered by the Texas Department of Agriculture.

Found convincing evidence? Learn how bed bug thermal treatment in DFW works and what homeowners should expect before treatment.

How Professional Bed Bug Treatment Works

Treatment should follow a proper inspection rather than being selected solely because someone has unexplained skin marks.

The exact approach depends on the property, extent and location of activity and treatment method being used.

Supremacy Services’ dedicated bed bug service focuses on professional thermal treatment. The service page describes a process that includes inspection, treatment setup, temperature monitoring and controlled heat circulation throughout targeted spaces.

That commercial page—not this identification guide—should remain the primary page for homeowners ready to investigate or schedule treatment.

What should homeowners expect before service?

Preparation requirements vary by treatment method and property.

A professional may need to know:

  • where evidence has been found;
  • which rooms are affected;
  • whether furniture has recently been moved;
  • whether occupants have recently traveled;
  • whether used furniture has entered the property;
  • whether previous treatments have been attempted.

Follow the pest professional’s preparation instructions rather than improvising a treatment plan.

How Do Bed Bugs Get Into Dallas Homes?

Bed bugs are primarily a transportation and hitchhiking problem, not evidence that a house is dirty.

The CDC notes that they can travel in luggage, overnight bags, folded clothing, bedding, furniture and other belongings.

That means exposure can occur in many environments where people and belongings move between locations.

For Dallas-Fort Worth households, practical risk situations can include travel, overnight guests, moving between residences and bringing secondhand furniture into a home.

Cleanliness alone does not determine whether bed bugs appear in a property.

Are Bed Bugs a Health Risk?

The CDC states that bed bugs are not known to spread disease to people.

They can still create health and quality-of-life problems. Bites may cause itching, and scratching can contribute to secondary skin infections. Some people can experience allergic reactions.

If you have severe swelling, signs of infection or another significant medical reaction, seek appropriate medical advice rather than relying on pest-control guidance for diagnosis.

Pest professionals address the infestation; healthcare professionals address medical symptoms.

How to Reduce the Risk of Bringing Bed Bugs Home

Prevention centers largely on recognizing how bed bugs hitchhike and inspecting belongings after potential exposure.

Practical precautions include:

  • inspect secondhand beds and upholstered furniture carefully before bringing them inside;
  • check luggage after travel;
  • inspect mattress seams when staying away from home;
  • avoid placing luggage directly on beds when traveling;
  • remain alert for unexplained spotting, cast skins or insects after travel;
  • investigate suspicious signs early rather than waiting for bite reactions.

Early identification is particularly valuable because smaller infestations are generally easier to locate and address than established ones.

Bed Bugs in Dallas Apartments and Multi-Unit Buildings

Bed bugs can occur in houses, apartments, hotels, dormitories and other places where people sleep.

Multi-unit properties can make investigation more complicated because determining where activity is occurring may require inspection beyond a single piece of furniture.

Renters who find convincing evidence should document what they see and follow the appropriate property-management reporting process while avoiding actions that could unnecessarily move potentially infested belongings into shared areas.

For treatment involving regulated structural pest-control services in Texas, homeowners and property managers can verify licensing information through the Texas Department of Agriculture.

What Does Bed Bug Treatment Cost?

There is no responsible single price that applies to every Dallas property.

Cost can vary according to factors such as:

  • size of the treatment area;
  • number of affected rooms;
  • extent of the infestation;
  • treatment method;
  • amount and type of furniture;
  • preparation requirements;
  • whether follow-up service is needed.

A property-specific inspection or assessment is therefore more useful than relying on an unsupported online price range.

If pricing is your primary concern, see Supremacy Services’ related guide to bed bug heat treatment cost in Dallas for the cost-focused search intent.


Frequently Asked Questions

What is usually the first physical sign of bed bugs?

Dark fecal spotting, small rusty stains, cast skins or an actual insect around mattress seams can provide early clues. There is no single sign that will always appear first.

What do bed bug droppings look like?

Bed bug fecal evidence can appear as tiny dark spots. The EPA notes that these marks may bleed into fabric similarly to marker ink.

Do bed bugs leave blood stains on sheets?

Rusty or reddish stains on sheets and mattresses are recognized signs of possible bed bug activity. They can occur when bugs are crushed, but stains alone do not confirm an infestation.

What do bed bug eggs look like?

Bed bug eggs are tiny and pale, making them difficult to see. The EPA describes them as approximately 1 millimeter in size.

Can you have bed bugs without bites?

Yes. Some people show no physical reaction to bed bug bites, so the absence of visible bite marks cannot rule out an infestation.

Where do bed bugs hide during the day?

Common hiding places include mattress seams, box springs, bed frames, headboards and nearby cracks. More established infestations can also involve upholstered furniture and other protected crevices.

Does seeing one bed bug mean you have an infestation?

One correctly identified bed bug warrants a thorough inspection. It does not tell you how extensive the problem is, but it should not be ignored.

Do bed bugs only live in dirty houses?

No. The CDC states that cleanliness does not determine whether bed bugs are present. They commonly spread by hitchhiking on luggage, clothing, bedding, furniture and other belongings.

What bugs are commonly mistaken for bed bugs?

Carpet beetles and other small household insects can sometimes be mistaken for bed bugs. Identification of the actual insect is more reliable than diagnosing an infestation from bites.

When should I call a bed bug professional?

Professional inspection is appropriate when you find a suspected live bug, repeated fecal spotting, shed skins or eggs; when activity appears in multiple locations; or when you cannot confidently determine what you are seeing.


Think You Found Bed Bugs in Your Dallas Home?

Bites alone cannot reliably tell you whether bed bugs are present.

Instead, look for the evidence they leave behind: dark fecal spotting, rusty stains, shed skins, tiny eggs and live insects concentrated around sleeping areas.

If you find multiple signs—or simply cannot determine whether the insect or evidence you found is actually from bed bugs—professional identification can prevent you from treating the wrong pest.

Found signs of bed bugs? Schedule a Dallas/DFW bed bug inspection with Supremacy Services and get a treatment recommendation based on what is actually happening in your home.

How Do Rats Get Into North Texas Homes?8 Entry Points

Rats usually get into North Texas homes through small structural gaps around the roofline, soffits, vents, utility penetrations, foundations and garage doors. They do not necessarily need an obvious hole. A damaged vent screen, separated roof edge, deteriorated seal around a pipe or gap beneath a door may provide enough access.

For Dallas-area homeowners, the location of the activity provides an important clue. Texas A&M AgriLife notes that roof rats commonly nest in attics and wall spaces, while Norway rats are more closely associated with burrows beneath foundations, floors and accumulated materials. Roof rats are also skilled climbers, making upper-level openings particularly important to inspect.

Finding the entry point matters just as much as removing the rats already inside. If the opening remains accessible, trapping a few animals may address the current activity without solving how rodents are entering the structure.

Table of Contents

  1. How Small an Opening Can a Rat Get Through?
  2. Roof, Eave and Soffit Gaps
  3. Attic and Roof Vents
  4. Gaps Around Utility Lines and Pipes
  5. Garage Doors and Exterior Doors
  6. Foundation and Crawlspace Openings
  7. Chimneys, Flashing and Roof Intersections
  8. Damaged Fascia, Siding and Exterior Materials
  9. Openings Reached From Trees, Fences and Utility Routes
  10. How Do You Find a Rat Entry Point?
  11. Should You Seal a Rat Hole Immediately?
  12. DIY Rat-Proofing vs. Professional Exclusion
  13. How to Make Your North Texas Home Less Attractive to Rats
  14. Frequently Asked Questions

How Small an Opening Can a Rat Get Through?

Some rats can use openings roughly 1/2 to 3/4 inch wide, depending on the species and animal, while mice can use even smaller openings.

CDC rodent-exclusion guidance recommends inspecting and sealing small gaps throughout a home, particularly around roofs, eaves, soffits, vents, doors, foundations and utility penetrations. Texas A&M guidance likewise recommends covering rodent-accessible openings with rat-resistant materials.

This is why a home can appear well sealed from the driveway yet still have a rodent-access problem.

A rat also may not need to find a perfectly sized opening. Rodents gnaw, and existing deterioration can sometimes be enlarged enough to improve access. Texas A&M identifies gnaw marks, droppings, tracks, grease smears and established runways as useful signs when investigating rodent activity.

Roof rats vs. Norway rats: where should you look first?

Comparison of roof rats using elevated attic and roof entry points versus Norway rats using ground-level foundation and burrow areas.
Roof rats are strongly associated with elevated areas such as attics and rooflines, while Norway rats are more commonly associated with ground-level areas and burrows.
ClueRoof ratNorway rat
Typical nesting tendencyElevated areas, walls and atticsBurrows and lower areas
Climbing abilityExcellentCapable, but more ground-oriented
First exterior areas to inspectRoofline, soffits, vents, upper openingsFoundation, ground-level openings, crawlspace
Attic noisesStrong cluePossible, but less characteristic
Burrows near foundationLess characteristicStronger clue

Texas A&M describes roof rats as the rat most commonly encountered in Texas homes and notes their ability to enter around roofs and soffits.

1. Roof, Eave and Soffit Gaps

Rat entering a damaged soffit opening beneath the roof of a North Texas home.
Damaged soffits, eaves and roofline gaps can provide rats with access to attic spaces.

Roof edges, eaves and soffits are among the first places to inspect when rats are active in an attic.

A soffit does not need to be completely missing. Look for:

  • separated soffit panels;
  • deteriorated corners;
  • gaps where different roof sections meet;
  • openings behind fascia;
  • damaged trim;
  • construction gaps;
  • previous repair areas that have reopened.

Roof rats are particularly relevant here because of their climbing behavior and preference for elevated nesting areas.

A homeowner hearing movement above the ceiling at night should therefore inspect the exterior roofline rather than assuming the animal entered somewhere near ground level.

Do not climb onto a steep or high roof simply to look for a rat hole. Much of the initial inspection can be performed safely from the ground with binoculars or a camera with zoom.


Hearing activity in the attic but cannot locate the opening? A professional rodent inspection can trace likely travel routes from the attic to exterior roofline vulnerabilities.

2. Attic and Roof Vents

Rat emerging through damaged screening on an attic vent of a residential home.
Damaged or poorly protected attic vents can create direct access into the attic while appearing relatively minor from the ground.

Damaged, unscreened or poorly fitted vents can provide direct access to attic spaces.

Check:

  • attic vents;
  • gable vents;
  • roof vents;
  • crawlspace vents;
  • vent screens;
  • gaps around vent housings.

CDC specifically recommends checking attic and crawlspace vents when rodent-proofing a structure.

The important distinction is between blocking airflow and excluding rodents. A ventilation opening still needs to perform its intended function. Appropriate pest-resistant screening or another properly designed exclusion method should preserve necessary ventilation while preventing animal access.

If you see bent screening, gnawing, dark rub marks or an opening along the vent perimeter, inspect the surrounding attic area for additional evidence.

3. Gaps Around Utility Lines and Pipes

Rat beside an unsealed opening where pipes and utility lines penetrate a brick exterior wall.
Oversized or deteriorated openings around plumbing, electrical and other utility penetrations are important areas to inspect for rodent access.

The openings created where plumbing, electrical, cable, HVAC or gas lines pass through an exterior wall are common places for rodents to exploit.

Construction requires penetrations through walls and foundations. If the finished opening is larger than the line passing through it—or if an old seal deteriorates—a usable gap can remain.

CDC specifically advises checking around:

  • electrical lines;
  • water lines;
  • gas lines;
  • sewer lines;
  • pipes beneath sinks;
  • water-heater and furnace piping;
  • cable penetrations.

Walk slowly around the outside of the house and examine every place where a line disappears through brick, siding, masonry or another exterior material.

Pay particular attention to penetrations hidden behind landscaping or equipment. These can be easy to miss during a quick inspection.

What does an active entry point look like?

An opening becomes more suspicious when you also find:

  • dark or greasy rub marks;
  • fresh gnawing;
  • droppings nearby;
  • disturbed insulation inside;
  • a worn travel path;
  • nesting material;
  • repeated sounds from the corresponding wall or ceiling.

One clue alone does not prove that a particular hole is active. Multiple signs in the same location make the case stronger.

4. Garage Doors and Exterior Doors

Rat entering beneath a garage door through a gap caused by a worn or poorly fitting bottom seal.
Even a relatively small opening beneath a garage door can give rodents access to the garage and potential routes farther into the home.

A gap beneath or beside a garage or exterior door can function like an open entrance for rodents.

Check the door while it is completely closed.

Look for daylight beneath the bottom seal and inspect:

  • worn garage-door weather seals;
  • damaged corners;
  • gaps at door jambs;
  • poorly fitting side doors;
  • warped exterior doors;
  • missing weather stripping.

CDC includes exterior doors and areas without effective weather stripping among the places homeowners should inspect for rodent access.

Garages deserve particular attention because they often contain stored pet food, bird seed, grass seed, cardboard boxes or other materials that can provide food or shelter.

A rat that reaches the garage may subsequently find another opening leading into a wall, ceiling or living area.

5. Foundation and Crawlspace Openings

Rats can enter through gaps where the foundation meets the structure, damaged crawlspace vents and other low-level openings.

These locations are especially important when the evidence appears closer to ground level.

Texas A&M notes that Norway rats typically burrow beneath foundations, floors, stored materials and rubbish rather than nesting primarily in high attic spaces.

Inspect for:

  • foundation penetrations;
  • damaged crawlspace screening;
  • openings beneath siding;
  • gaps around plumbing;
  • burrows near slabs or walls;
  • deteriorated masonry;
  • openings beneath porches or additions.

A burrow does not automatically prove that rats have entered the house, but burrowing activity adjacent to a structure deserves closer inspection.

6. Chimneys, Flashing and Roof Intersections

Complex roof intersections can create hidden openings that are difficult to see from ground level.

Pay attention to areas around:

  • chimney flashing;
  • roof-to-wall intersections;
  • roof valleys;
  • dormers;
  • loose shingles;
  • roof penetrations;
  • remodeling transitions.

Texas A&M specifically recommends checking entry points around chimneys and loose shingles when excluding rodents from homes.

These locations are particularly relevant to roof rats because an animal capable of reaching the roof does not need a ground-level entrance.

The actual opening may also be several feet from where the homeowner hears the animal. Once inside an attic or wall system, rodents can travel within concealed structural spaces.

7. Damaged Fascia, Siding and Exterior Materials

Rot, storm damage, previous construction work and ordinary deterioration can expose gaps that were not originally accessible.

Inspect the exterior for:

  • loose fascia;
  • separated trim;
  • broken siding;
  • rotted wood;
  • gaps from previous cable or plumbing work;
  • missing exterior covers;
  • deteriorated patches.

Rodents are persistent gnawers. Texas A&M reports that rats and mice can damage wood, doors, walls, pipes and other building materials.

That means a marginal weakness in the exterior should not be ignored simply because it does not initially look large enough.

Materials used for exclusion should be selected for the opening and building component involved. Texas A&M recommends rodent-resistant materials such as hardware cloth, steel wool, sheet metal or concrete in appropriate applications. CDC similarly recommends metal, hardware cloth, cement and other durable materials for larger holes.

8. Openings Reached From Trees, Fences and Utility Routes

Tree branches, vines, fences and structural features can help climbing rats reach upper portions of a house—but the final problem is still an opening in the building.

A tree touching a roof does not by itself create an infestation. It can, however, provide a route toward an accessible roofline opening.

Roof rats are strong climbers and favor elevated locations. Texas A&M’s rodent-management guidance describes roof rats as using elevated nesting sites such as attics, walls and roofs.

Look around the house for:

  • branches touching or overhanging the roof;
  • dense vines against exterior walls;
  • fences connecting with the structure;
  • utility routes leading toward upper walls;
  • shrubs that conceal lower-level openings.

The goal is not simply to remove vegetation. It is to understand how a rat reaches the building and where it crosses the building envelope.

Quick Rat Entry-Point Inspection Checklist

AreaWhat to check
RooflineGaps, separated materials, gnawing
Soffits/eavesLoose panels, damaged corners
Attic ventsBroken or missing screening
ChimneyFlashing and perimeter gaps
Utility linesOversized or deteriorated penetrations
GarageBottom and corner door gaps
FoundationCracks, penetrations, burrows
CrawlspaceDamaged vents or screening
Siding/fasciaRot, gaps, loose materials
LandscapingRoutes toward roof or concealed openings

How Do You Find a Rat Entry Point?

Start where you have evidence inside the house, then trace outward to the nearest exterior vulnerabilities.

A systematic inspection is more useful than randomly filling holes.

Step 1: Identify where activity is strongest

Record where you hear scratching, find droppings or see gnawing.

If the evidence is concentrated in an attic, begin with the roofline and upper exterior. If it is concentrated near a garage, kitchen or crawlspace, inspect nearby lower-level penetrations first.

Step 2: Inspect the corresponding exterior area

Look at the outside of the wall, ceiling or attic zone where activity occurs.

Check vents, roof edges, pipes, cables, door seals and construction transitions.

Step 3: Look for evidence of repeated use

Texas A&M identifies droppings, tracks, gnawing, greasy smears and established runways as indicators of rodent activity.

Step 4: Inspect the entire building envelope

Do not stop after finding the first suspicious hole.

There may be more than one entry point.

A proper exclusion inspection should work from the roofline to the foundation, because sealing one opening accomplishes little if another remains accessible.

If you are finding several possible openings—or rats keep returning after trapping—schedule a complete rodent exclusion inspection to identify active entry routes and vulnerabilities from the roofline to the foundation.

Should You Seal a Rat Hole Immediately?

Not always. If rats are already inside, blindly closing an active opening can leave animals trapped within the structure.

Exclusion needs to be coordinated with control of the animals already indoors.

CDC recommends checking how rodents entered, sealing openings and trapping rodents that remain inside.

This is one reason a significant infestation can be more complicated than simply applying expanding foam to a visible gap.

You need to answer three questions:

  1. Is the opening actually being used?
  2. Are rodents still inside?
  3. Are there additional entrances elsewhere?

Closing the wrong opening at the wrong stage can leave the underlying infestation unresolved.

DIY Rat-Proofing vs. Professional Exclusion

Small, accessible maintenance issues may be reasonable for a homeowner to correct. A deteriorated door sweep, for example, is very different from an active opening at a second-story soffit.

SituationDIY may be reasonableProfessional inspection is more appropriate
Worn door sweep✓
Simple accessible utility gap with no activity✓
Repeated attic noises✓
Multiple possible entry points✓
High roofline opening✓
Active infestation✓
Rats returning after trapping✓
Extensive droppings/nesting✓
Uncertain animal identification✓

What should professional rodent exclusion include?

A thorough service should focus on both the animals and the structure.

Depending on the property and infestation, that can include:

  1. inspecting the attic and interior evidence;
  2. identifying whether rats, mice or another animal are responsible;
  3. tracing likely travel routes;
  4. inspecting the roofline, vents, utility penetrations, doors and foundation;
  5. identifying active and potential entry points;
  6. controlling rodents already inside;
  7. sealing appropriate openings with durable exclusion materials;
  8. evaluating whether contamination or nesting material requires cleanup;
  9. reassessing activity after control measures are installed.

Supremacy Services’ current Rodent Control & Exclusion service describes a similar sequence: property inspection, targeted trapping, exterior exclusion and follow-up/sanitation.

How to Make Your North Texas Home Less Attractive to Rats

Exclusion works best when rats also have fewer reasons to remain around the property.

CDC recommends reducing access to food, water and shelter around homes.

Practical steps include:

  • keep garbage containers closed;
  • avoid leaving pet food outside overnight;
  • clean spilled bird seed and animal feed;
  • address accessible water sources and leaks;
  • remove unnecessary clutter;
  • keep storage organized;
  • clean around outdoor cooking areas;
  • reduce dense vegetation immediately against the structure;
  • inspect garages and sheds as well as the main house.

These measures do not replace exclusion when rats are already entering the structure. They reduce the conditions that make the property attractive while structural access points are being addressed.

Are Rats Really the Animal Making the Noise?

Not every attic sound is a rat.

North Texas homes can also be entered by mice, squirrels and larger wildlife. The timing, location, type of sound, droppings and physical damage can help narrow the possibilities.

Roof rats tend to be active after dark, and Texas A&M notes that noises in attics or ceilings at night can indicate roof-rat activity.

Daytime movement may raise suspicion of squirrels, although timing alone should not be treated as definitive identification.

If you cannot identify the animal, avoid choosing a control strategy solely from the noise.

Frequently Asked Questions

What is the most common way rats get into a house?

There is no single entry point for every house. Common vulnerabilities include roof and soffit gaps, vents, utility penetrations, door gaps and foundation openings. In Texas homes with roof-rat activity, upper roofline openings deserve particular attention.

Can rats get into a house through the roof?

Yes. Roof rats are skilled climbers and commonly use elevated nesting areas. Gaps around soffits, eaves, vents, flashing and other roof components can provide access to an attic.

Can rats enter through attic vents?

They can enter through damaged, unscreened or poorly protected vent openings. Ventilation should not simply be blocked; appropriate rodent-resistant screening should preserve the vent’s intended function.

Can rats come in under a garage door?

Yes. A sufficiently large gap beneath or around a garage door can provide access. Check worn bottom seals, corners and side weather stripping.

How do I know where rats are getting in?

Start near the area with the strongest indoor evidence and inspect the corresponding exterior. Look for openings accompanied by gnawing, grease marks, droppings, tracks or disturbed materials.

Can rats climb walls?

Roof rats are particularly capable climbers. They can use vegetation and structural features to reach elevated portions of buildings, which is why attic infestations should trigger an inspection of the entire roofline.

Should I use spray foam to close a rat hole?

Foam alone should not automatically be considered a durable rodent barrier. CDC and Texas A&M recommend rodent-resistant materials such as metal, hardware cloth and other durable materials depending on the opening.

Should I seal a hole if a rat is already inside?

The infestation and exclusion process should be coordinated so rodents are not inadvertently trapped inside inaccessible parts of the structure. Identify active entrances and address the animals already indoors as part of the plan.

Why do rats keep coming back after I trap them?

Trapping removes individual animals but does not necessarily eliminate structural access. If exterior openings remain, other rodents can enter later.

When should I call a professional?

Professional help is particularly useful when rats are active in an attic or walls, several entry points are possible, openings are located on a difficult roofline, the infestation persists after trapping, or you cannot safely determine where animals are entering.


Stop the Entry Point, Not Just the Rat

Finding a rat indoors answers only half of the problem.

The more important question is:

How did it get inside?

For North Texas homeowners, that investigation should cover the entire exterior—from roof vents, soffits and chimney flashing to utility penetrations, garage doors, crawlspaces and foundation gaps.

Removing active rodents without correcting access can allow the problem to return. Likewise, sealing random gaps without understanding whether animals remain inside can create a different problem.

A successful approach combines identification, removal or trapping, structural exclusion and prevention.

Hearing rats in your attic or finding droppings, gnaw marks or suspected entry holes? Supremacy Services provides rodent inspections, targeted control and exterior exclusion throughout Dallas and the DFW Metroplex. Schedule a rodent inspection to find where they are getting in and develop a plan to close the access points.

Cutaway of a Dallas home showing a leaking water pipe beneath the concrete slab foundation

Slab Leak Repair Cost in Dallas: Detection, Repair Methods & Pricing

A slab leak can be one of the harder plumbing problems to diagnose because the leaking water line may be buried beneath the concrete foundation rather than exposed inside a wall or cabinet.

For Dallas homeowners, slab leak repair cost depends heavily on where the leak is located, how easily the pipe can be reached, whether the damaged section can be repaired directly, and whether rerouting part of the plumbing system makes more sense.

As a broad 2026 market reference, Angi reports national slab-leak projects commonly ranging from approximately $630 to $4,400, with an average around $2,280, including detection. Those figures are not a Dallas price quote. A complicated under-slab repair involving concrete removal, flooring restoration or extensive repiping can differ substantially.

The most useful first step is therefore not choosing a repair method—it is determining exactly where the leak is and which pipe has failed.

Table of Contents

  1. What Is a Slab Leak?
  2. How Much Does Slab Leak Repair Cost in Dallas?
  3. What Affects Slab Leak Repair Cost?
  4. How Are Slab Leaks Detected?
  5. Slab Leak Repair Methods
  6. Repair Through the Slab vs. Rerouting
  7. Warning Signs of a Slab Leak
  8. What Causes Slab Leaks?
  9. Slab Leak or Another Plumbing Problem?
  10. Can You Repair a Slab Leak Yourself?
  11. What to Expect During Professional Repair
  12. Dallas Permits and Water-Bill Considerations
  13. How to Reduce the Risk of Future Leaks
  14. FAQs

What Is a Slab Leak?

A slab leak is a plumbing leak in a water line located beneath or within a home’s concrete slab foundation.

Unlike a leaking faucet or exposed pipe, the source may not be visible. Water can escape below the flooring or foundation for some time before homeowners notice obvious symptoms.

Slab leaks should also be distinguished from several other problems:

  • a leaking water service line outside the foundation;
  • a drain or sewer-line failure;
  • a leaking appliance connection;
  • a toilet or fixture leak;
  • moisture entering from outside the structure; or
  • an above-slab pipe leaking inside a wall.

Determining which problem you actually have matters because the appropriate repair—and its cost—can be completely different.


How Much Does Slab Leak Repair Cost in Dallas?

There is no reliable single flat price for slab leak repair in Dallas because accessibility and repair method can change the scope dramatically.

Current national consumer-market data from Angi places many slab-leak projects between approximately $630 and $4,400, with a reported 2026 average of about $2,280 including detection. Treat that as a budgeting benchmark rather than a Dallas-specific quote.

Angi separately reports that ordinary pipe-leak repairs in Dallas average around $516, with many projects between approximately $258 and $876. That Dallas figure covers pipe-leak repair generally and should not be interpreted as the expected price of an under-slab project.

Why slab-leak pricing varies so much

Consider two homes with similar leaking pipes.

In the first, the plumber pinpoints a leak beneath an accessible utility area and can expose a small section of slab.

In the second, the failed line runs beneath finished flooring, cabinets or another difficult area. The plumber may recommend rerouting the line rather than opening the slab.

Both homes technically have a “slab leak,” but the labor, access and restoration requirements are very different.

Budget for the entire project—not just the pipe

A complete estimate may need to account for:

Cost componentWhy it matters
Leak detectionDetermines where the leak is before demolition begins
Plumbing repairRepairs, isolates or replaces the failed line
AccessMay involve opening concrete, flooring, walls or ceilings
Pipe material and lengthInfluences materials and labor
Rerouting/repipingMay replace the need to access the pipe beneath the slab
Concrete restorationRequired when direct slab access is used
Flooring/finish restorationTile, hardwood, cabinets or drywall may require separate work
Permit/inspectionDepends on the scope and local requirements
Water damage remediationSeparate from the plumbing repair if significant damage occurred

Homeowner tip: When comparing estimates, ask whether the quote includes leak detection, access, plumbing work, concrete repair and finish restoration—or only the plumbing portion.


What Affects Slab Leak Repair Cost?

Infographic showing leak location, detection, pipe material, concrete access, repair method, flooring and permits as slab leak cost factors.
Slab leak repair costs vary because accessibility, pipe condition, repair method and restoration requirements differ from home to home.

1. The exact location of the leak

Accessibility is one of the largest cost variables.

A leak underneath an open utility area can be much simpler to reach than one underneath a kitchen island, bathroom, built-in cabinetry or expensive finished flooring.

2. Whether the leak has already been located

Accurate diagnosis helps prevent unnecessary exploratory demolition.

A plumber may first confirm that the pressurized water system is losing water and then use specialized equipment to narrow down the leak location.

3. Direct repair versus rerouting

Sometimes accessing the damaged pipe through the concrete is practical.

In other situations, abandoning the failed underground section and installing a new route through accessible walls, ceilings or attic areas may reduce structural disruption.

The best choice depends on the plumbing layout, pipe condition and leak location—not simply which option sounds less invasive.

4. How much piping is affected

One isolated failure may justify a localized repair.

Repeated leaks or deterioration across a larger piping system may prompt a discussion about rerouting or repiping rather than continuing to repair individual failures.

5. Flooring and interior finishes

Breaking concrete is only part of the restoration equation.

Tile, hardwood, luxury vinyl, cabinets and other finishes can materially affect total project cost.

6. Emergency conditions

An actively leaking pipe that cannot be isolated may require faster intervention than a small, contained leak.

If water is escaping rapidly, shut off the appropriate water supply when it is safe to do so and arrange professional diagnosis.


How Are Slab Leaks Detected?

Supremacy Services technician using acoustic equipment to locate a hidden water leak beneath a home's flooring.
Professional leak detection can help narrow down an under-slab leak before concrete or finished flooring is opened.

Professional slab leak detection usually begins by confirming that the plumbing system is actually losing water, then narrowing down the location before opening the slab.

The objective is to avoid unnecessary demolition.

Common diagnostic approaches include:

Water-meter testing

With all fixtures and water-using appliances turned off, unexpected meter activity can indicate water is still flowing somewhere in the system.

This test can suggest a leak, but it does not tell you where the leak is.

Pressure testing

A plumber can test sections of the water-supply system to determine whether pressure is being lost.

This can help distinguish a pressurized supply-line leak from other sources of moisture.

Acoustic leak detection

Escaping pressurized water creates sound and vibration.

Specialized listening equipment can help technicians narrow down the source beneath floors or concrete.

Thermal imaging

Temperature differences associated with leaking hot-water lines can sometimes produce patterns detectable with infrared equipment.

Thermal imaging is a diagnostic aid—not proof by itself of the precise location or cause of a leak.

Isolation testing

When necessary, sections of the plumbing system can be isolated to determine which branch contains the failure.

Supremacy’s existing Water Leak Detection service describes acoustic, infrared, electronic and pressure-testing approaches for locating hidden plumbing leaks before unnecessary cutting or demolition.

Suspect a hidden leak but do not know where it is? Schedule professional water leak detection before deciding how the slab should be repaired.


Slab Leak Repair Methods

Once the leak has been located, the plumber can recommend a repair based on the pipe condition, location and accessibility.

Direct access through the slab

This approach involves opening the flooring and concrete near the confirmed leak location, exposing the pipe and repairing the damaged section.

May make sense when:

  • the failure is highly localized;
  • the pipe is reasonably accessible;
  • the surrounding piping appears serviceable; and
  • opening the slab is less disruptive than rerouting the line.

Potential disadvantages:

  • concrete must be opened;
  • flooring may be damaged or removed;
  • dust/noise must be managed;
  • the slab and finishes require restoration afterward.

Rerouting the affected water line

Instead of reopening the original underground route, the plumber may disconnect or abandon the failed section and install a replacement line through an accessible route.

Depending on the home, that could involve walls, ceilings or other accessible spaces.

Rerouting may be considered when:

  • the leak is beneath an especially difficult area;
  • direct access would cause excessive damage;
  • the affected run can be replaced through a practical alternative route; or
  • the condition of the original line makes another localized underground repair unattractive.

Repiping a larger section

A single slab leak does not automatically mean a home needs to be repiped.

However, multiple failures or broader pipe deterioration can change the economics. Homeowners should ask whether the diagnosed problem appears isolated or whether there is evidence of a more widespread piping issue.


Repair Through the Slab vs. Rerouting

Comparison of direct slab access and pipe rerouting methods for repairing an under-slab plumbing leak.
Direct repair reaches the original pipe through the slab, while rerouting replaces the affected run through a more accessible path.
QuestionDirect slab accessRerouting
Does the original pipe get exposed?YesUsually no
Concrete opening required?UsuallyOften avoided for the failed section
Best for isolated accessible leak?OftenDepends
Can it avoid finished-floor demolition?Not alwaysPotentially
Changes pipe routing?NoYes
Restoration required?Concrete/flooringWalls/ceilings may require repair
Best option determined byLeak location and pipe conditionLayout and practical alternative route

There is no universally superior method.

A properly diagnosed leak beneath an accessible section of slab may be straightforward to repair directly. A leak under expensive flooring or difficult structural features may make rerouting more practical.

Have a confirmed under-slab leak? Ask Supremacy Services to compare direct repair and rerouting options based on the actual location and condition of your plumbing.


Warning Signs of a Slab Leak

Infographic showing higher water bills, running-water sounds, wet flooring, warm floors, low pressure and musty odors as possible leak signs.
Unexplained water usage, moisture, warm flooring and running-water sounds can indicate a hidden plumbing leak that needs further investigation.

A slab leak can produce several symptoms, but none of these signs alone proves that the pipe beneath your foundation is leaking.

Unexplained increase in water usage

If household habits have not changed but water consumption rises, investigate for leaks.

Dallas Water Utilities notes that customers pay for water passing through the meter whether the water is intentionally used or lost through a leak.

Water meter movement when everything is off

Turn off faucets, fixtures and water-using appliances.

If the meter continues registering usage, water may be escaping somewhere downstream of the meter.

Sound of running water

Hearing water movement when fixtures are not operating can justify further investigation.

Warm flooring

An unexplained warm area can sometimes accompany a leaking hot-water line beneath the slab.

However, warm flooring alone is not sufficient to diagnose a slab leak.

Damp or discolored flooring

Moisture appearing without an obvious spill or fixture leak warrants investigation.

Reduced water pressure

A significant supply-line leak can affect available pressure, although low pressure has many other potential causes.

Musty odors or persistent moisture

Hidden moisture may affect flooring, baseboards and nearby building materials.

The source still needs to be identified before assuming it originates beneath the slab.


What Causes Slab Leaks?

Slab leaks can result from several different mechanisms rather than one single Dallas-specific cause.

Aging or deteriorated pipe

Plumbing materials can deteriorate over time depending on pipe type, installation, water conditions and service history.

Failed joints or fittings

The failure may occur at a fitting or connection rather than along a straight pipe section.

Installation-related problems

Improper installation, damaged pipe or excessive stress at a connection can contribute to premature failure.

Movement and mechanical stress

Pipes should be installed so that normal movement and expansion do not create damaging stress.

A professional diagnosis should focus on the actual failed component rather than assuming every under-slab leak has the same cause.


Slab Leak or Another Plumbing Problem?

Several common problems can imitate some of the symptoms of a slab leak.

SymptomPossible slab leakOther possibilities
High water billYesRunning toilet, irrigation leak, fixture leak
Wet floorYesAppliance, toilet, shower or supply-line leak
Low water pressurePossibleValve issue, main-line problem, fixture restriction
Wet yardLess typical for interior slab leakService-line or irrigation leak
Sewer odorNot typical of clean-water slab leakDrain/sewer problem
Warm floorPossible hot-water leakRadiant heat or environmental causes
Foundation moisturePossibleDrainage or exterior water intrusion

Slab leak vs. main water-line leak

A slab leak occurs beneath or within the foundation area.

A main/service water-line leak can occur between the municipal connection/meter and the house, often outside the slab.

Supremacy already has a dedicated Water Line Repair and Replacement service page for broader water-line failures, so homeowners with wet yards, service-line problems or whole-property pressure issues should be directed there rather than treating every underground leak as a slab leak.

Slab leak vs. sewer-line problem

A pressurized water-supply leak and a damaged sewer line require different diagnostic methods and repairs.

Recurring drain backups, widespread slow drains, sewage odors and wastewater appearing where it should not are stronger reasons to investigate the drainage/sewer system.


Can You Repair a Slab Leak Yourself?

Diagnosing and repairing a concealed under-slab plumbing leak is generally a poor DIY project because accurate location, pipe isolation, concrete access and code compliance may all be involved.

Texas does provide a homeowner exemption allowing qualifying property owners to perform plumbing work on their own homestead, but that does not eliminate applicable local permit, inspection or code requirements. The Texas State Board of Plumbing Examiners specifically advises homeowners to check municipal requirements.

The City of Dallas likewise states that qualifying homeowners performing their own plumbing work must obtain permits and inspections when required and comply with applicable plumbing codes.

A homeowner can still perform useful preliminary observations:

  • check whether all fixtures are off;
  • look at the water meter;
  • document unexplained water usage;
  • identify visible moisture;
  • note whether the problem appears associated with hot or cold water;
  • locate the main shutoff before an emergency occurs.

Avoid breaking flooring or concrete simply because a wet or warm area appears nearby. Water can travel away from the actual pipe failure.


What to Expect During Professional Slab Leak Repair

Supremacy Services technician explaining under-slab leak detection findings and repair options to a homeowner.
A professional assessment helps homeowners understand where the leak is located and compare appropriate repair options before work begins.

A well-planned slab leak project generally follows a diagnostic sequence rather than starting with demolition.

Step 1: Confirm the leak

The plumber determines whether the water-supply system is actually losing water.

Step 2: Narrow down the affected line

Testing helps determine which portion of the plumbing system is involved.

Step 3: Locate the leak

Diagnostic equipment and testing are used to narrow down the likely failure point.

Step 4: Evaluate the pipe and access

The plumber considers:

  • leak location;
  • pipe material;
  • accessibility;
  • surrounding finishes;
  • plumbing layout;
  • condition of the affected run; and
  • whether other failures are evident.

Step 5: Compare repair methods

The homeowner should receive an explanation of why direct repair, rerouting or a broader piping solution is being recommended.

Step 6: Obtain required permits when applicable

The permitting requirement depends on the work being performed.

Dallas currently uses the 2021 International Plumbing Code with local amendments.

Step 7: Complete the plumbing work

The damaged section is repaired or bypassed according to the selected method.

Step 8: Verify the repair

The system should be checked after repair to confirm that the diagnosed leak has been addressed.

Step 9: Restore affected finishes

Depending on the repair method, this may include concrete, flooring, drywall, paint or other finish work.


Dallas Permits and Water-Bill Considerations

Does slab leak repair require a permit in Dallas?

It depends on the scope.

The City of Dallas lists stopping a leak without replacing or rearranging valves, pipes or fixtures among work that may not require a permit. More substantial plumbing alteration or replacement may require permitting and inspection.

Because slab-leak projects can involve pipe replacement or rerouting, homeowners should verify the requirements for their specific repair rather than assuming the project is exempt.

For permitted professional plumbing work, Dallas states that a licensed Master Plumber registered with the city may obtain a plumbing permit.

Can Dallas homeowners get a water-bill adjustment after a leak?

Potentially.

Dallas Water Utilities operates a Leak Adjustment Program for qualifying leaks that cause substantial increases in water consumption. The city states that an approved adjustment is limited to one adjustment per 12-month period and a maximum of three months of affected usage.

The program adjusts eligible excess water consumption; it does not reimburse the plumbing repair itself. Repairs must be completed and supporting information is required.

Keep:

  • the repair date;
  • detailed description of the work;
  • plumber’s invoice;
  • property/service address; and
  • relevant account information.

These records can also help document when the problem was corrected.


How to Reduce the Risk of Future Leaks

Not every slab leak can be prevented, but early detection can reduce the amount of water lost before a hidden problem is found.

Watch your normal water usage

A sudden unexplained change deserves attention.

Investigate recurring leaks

If a property has experienced more than one piping failure, ask whether the leaks appear unrelated or indicate deterioration affecting a larger part of the system.

Do not ignore unexplained moisture

Water showing up around floors, baseboards or cabinets should have an identified source.

Know where your shutoff is

Being able to stop water quickly can be valuable during an active plumbing failure.

Keep plumbing records

Knowing the age, material and previous repair history of the plumbing system gives future plumbers useful context.


Questions to Ask Before Approving a Slab Leak Repair

Before signing a repair proposal, ask:

  • How was the leak confirmed?
  • How precisely has it been located?
  • Which pipe or branch has failed?
  • Is the failure isolated?
  • Why are you recommending direct repair or rerouting?
  • What areas of the home need to be opened?
  • Who restores the concrete, flooring or drywall?
  • Is restoration included in this estimate?
  • Does the repair require a permit?
  • What testing will be performed after repair?
  • What parts and labor warranties apply?
  • Could another section of the same piping system be at risk?

A clear diagnosis should come before a major repair recommendation.


Slab Leak FAQs

How much does it cost to repair a slab leak in Dallas?

There is no reliable flat Dallas price. As a national 2026 market benchmark, Angi reports many slab-leak projects between about $630 and $4,400, averaging roughly $2,280 including detection. Dallas pricing will depend on location, access, repair method and restoration requirements.

How do plumbers know where a slab leak is?

Plumbers can combine water-meter observations, pressure or isolation testing, acoustic equipment, electronic leak detection and other diagnostic methods. The goal is to narrow down the failed line before opening finished surfaces.

Do you have to break the concrete to fix a slab leak?

Not always. Some leaks are repaired by accessing the pipe through the slab. In other situations, the affected line can be rerouted through a more accessible location.

Is rerouting better than repairing a pipe under the slab?

Neither method is automatically better. The appropriate choice depends on the leak location, pipe condition, plumbing layout and amount of disruption each method would require.

Does homeowners insurance cover slab leaks?

Coverage depends on the policy, cause of loss and circumstances. Plumbing repair and resulting water damage may also be treated differently. Homeowners should review their policy and ask their insurer what documentation is required before assuming coverage.

Can a slab leak increase my Dallas water bill?

Yes. A leak in a metered water-supply line can increase recorded water consumption. Dallas Water Utilities notes that customers are responsible for water passing through their meter, although qualifying customers may request a leak adjustment after repairs.

How urgent is a slab leak?

An active leak should be investigated promptly. The urgency increases when water loss is significant, moisture is entering finished areas, pressure is dropping or the leak cannot be isolated.

Can I find a slab leak using my water meter?

The meter can help indicate whether water is flowing while fixtures are off, but it cannot identify the leak’s exact location. A running meter could indicate several types of plumbing leaks.

Should I repair one leak or repipe the house?

One isolated failure does not automatically justify repiping. If there have been repeated failures or widespread deterioration, however, comparing continued spot repairs with a broader piping solution may be worthwhile.


Need Help Locating an Under-Slab Leak in Dallas?

A slab leak repair should begin with evidence, not unnecessary demolition.

Supremacy Services provides leak detection and plumbing repair throughout Dallas and the DFW Metroplex. A professional assessment can determine whether the problem is actually beneath the slab, locate the affected line and compare repair approaches based on the home’s plumbing layout.

If the source has not yet been confirmed, start with professional water leak detection. If testing identifies a broader supply-line problem, review water line repair and replacement options before choosing the scope of work.

VRV system compared with traditional rooftop commercial HVAC equipment on a Dallas building

VRV vs Traditional Commercial HVAC: Which System Is Better for Dallas Buildings?

For Dallas commercial buildings, VRV vs traditional HVAC is not a question with one universal winner. VRV systems can be especially attractive when a building needs independent temperature zones, variable loads, limited ductwork or simultaneous heating and cooling. Traditional commercial systems—including packaged rooftop units and conventional split or central systems—may make more sense when simplicity, existing infrastructure, familiar servicing or a lower-complexity replacement is the priority.

The right choice depends on the building rather than the technology alone.

For Dallas property owners, facility managers and developers, the most useful comparison includes cooling loads, zoning, ventilation, installation constraints, controls, maintenance requirements, upfront investment and long-term operating needs.

VRV vs Traditional Commercial HVAC: Quick Comparison

FactorVRV/VRF SystemTraditional Commercial HVAC
Temperature controlExcellent individual-zone controlDepends heavily on system and zoning design
Capacity controlVariable-speed/modulatingVaries from staged to variable-capacity
DuctworkOften substantially reducedUsually more dependent on duct distribution
Simultaneous heating/coolingAvailable with heat-recovery configurationsUsually requires additional system design
Retrofit flexibilityOften useful where large ducts are difficultAdvantageous when usable ducts already exist
ControlsSophisticated multi-zone controlsCan range from simple thermostats to advanced BAS
Installation complexityRequires VRV/VRF-specific design and commissioningOften more familiar to commercial HVAC contractors
VentilationUsually requires a separate ventilation strategyOften integrated more directly with air-handling equipment
Best fitMulti-zone, variable-load buildingsMany warehouses, retail spaces and simpler commercial layouts
Final selectionRequires building-specific engineeringRequires building-specific engineering

The important point is that “traditional HVAC” covers several technologies. A modern variable-air-volume system is very different from a basic single-zone rooftop unit. Therefore, system selection should compare actual proposed designs rather than technology labels alone.


What Is a Commercial VRV HVAC System?

Commercial VRV HVAC system connecting one outdoor unit to multiple independently controlled office zones
A VRV system can connect multiple indoor zones to outdoor equipment, allowing individual areas of a commercial building to respond to different heating and cooling demands.

A VRV system—Variable Refrigerant Volume—is a multi-zone HVAC system that varies the amount of refrigerant supplied to individual indoor units according to demand.

VRF, or Variable Refrigerant Flow, is the generic industry term. VRV is terminology associated with Daikin.

The U.S. Department of Energy defines commercial VRF equipment as split-system equipment incorporating variable-capacity compression and multiple individually controlled indoor fan-coil units connected through common refrigerant piping and communications.

Instead of sending conditioned air through one large duct network to every part of a building, VRV/VRF systems move refrigerant to individual indoor units serving separate zones.

That architecture creates one of VRV’s main advantages: different areas can respond more closely to their individual loads.

For example, a Dallas office building may have:

  • conference rooms with intermittent occupancy;
  • west-facing offices receiving substantial afternoon solar heat;
  • interior spaces with little solar exposure;
  • server or equipment rooms requiring cooling for longer periods;
  • vacant offices needing little conditioning.

Rather than treating every area as though its load were identical, VRV allows the system to respond zone by zone.

How Does Traditional Commercial HVAC Work?

Traditional commercial HVAC may refer to several system types, including:

  • packaged rooftop units;
  • commercial split systems;
  • central air-handling systems;
  • variable-air-volume systems;
  • heat pumps;
  • furnace-and-air-conditioning combinations.

ASHRAE notes that commercial building HVAC selection varies with building size and class. Smaller office buildings commonly use packaged unitary or split equipment, while larger buildings may use combinations of packaged, split and centralized systems.

That distinction matters.

A VRV vs rooftop unit comparison, for example, is more meaningful than simply saying VRV versus “central air.”

Packaged Rooftop Units

Rooftop units, commonly called RTUs, combine major HVAC components into equipment installed on the roof and distribute conditioned air through ductwork.

They are widespread in retail, restaurants, offices, warehouses and other commercial properties.

Their strengths can include straightforward replacement when a building already has rooftop curbs and ducts, relatively familiar service procedures and centralized equipment locations.

Conventional Split or Central Systems

Commercial split and central systems separate equipment into indoor and outdoor components and distribute heating or cooling through ductwork, air handlers or terminal equipment.

The configuration can range from relatively simple to extremely sophisticated.


Is VRV More Energy Efficient Than Traditional HVAC?

VRV can reduce energy use in the right building, but VRV should not automatically be described as more efficient than every conventional commercial HVAC system.

VRV systems can gain efficiency advantages from several design characteristics.

1. Variable-Capacity Operation

An inverter-driven compressor can adjust output as building demand changes rather than operating only at full capacity or off.

This is particularly useful in buildings where loads vary significantly throughout the day.

2. Individual Zone Control

Conditioning an unused conference room and a fully occupied office identically can waste energy.

VRV systems allow individual zones to respond separately, reducing unnecessary conditioning when the system is properly designed and controlled.

3. Reduced Dependence on Large Supply Ducts

VRV distributes heating and cooling primarily through refrigerant piping rather than using large duct systems to transport all thermal energy.

The U.S. Department of Energy has identified reduced fan energy and avoidance of duct thermal losses as potential advantages of VRF and ductless heat-pump technologies.

Ventilation air still has to be properly provided; VRV does not eliminate that requirement.

4. Heat Recovery

Certain heat-recovery VRV systems can move energy between zones.

For example, if an interior equipment room requires cooling while perimeter offices need heating, an appropriately designed heat-recovery system may redistribute heat rather than simply rejecting all of it outdoors.

That capability can be useful in buildings with simultaneous heating and cooling loads.

Why Dallas Climate Makes System Selection Important

Dallas/Fort Worth has a substantial cooling season.

National Weather Service 1991–2020 climate normals show normal DFW high temperatures of approximately 95.6°F in July and 95.8°F in August. The same climate dataset reports an average of roughly 20 days reaching 100°F per year.

Commercial cooling equipment therefore needs to handle prolonged warm-weather operation without sacrificing comfort or reliability.

But Dallas still experiences meaningful winter heating requirements.

That makes part-load performance, heat-pump capability, zoning and system controls relevant alongside peak cooling capacity.

A system should consequently be selected from a proper building load analysis—not simply from square footage or the capacity of the equipment being replaced.

VRV vs Rooftop HVAC Units

VRV refrigerant piping and indoor units compared with a traditional rooftop HVAC unit and ductwork
VRV distributes heating and cooling through refrigerant piping to individual zones, while traditional rooftop HVAC commonly uses ductwork to distribute conditioned air.

For many Dallas commercial properties, the practical decision is not VRV versus an abstract “traditional HVAC system.” It is VRV versus packaged rooftop units.

QuestionVRVRooftop Unit
Many independent zones?Strong candidateRequires zoning/multiple units or additional controls
Existing usable ductwork?May not need much of itCan make RTU replacement attractive
Large open floor area?Possible, but benefits may be smallerOften practical
Limited interior duct space?Strong advantageCan become challenging
Simple equipment replacement?Usually more redesignOften easier if infrastructure already matches
Heat recovery between zones?Available on suitable systemsNot normally inherent in basic RTUs
Individual tenant control?Strong capabilityDepends on configuration
Dedicated ventilation needed?YesCan often be incorporated through RTU design
Specialized commissioning?Particularly importantAlso important, generally more familiar

When Rooftop HVAC May Make More Sense

A conventional packaged system can remain a practical choice when:

  • the building has large, relatively uniform spaces;
  • existing ductwork is correctly sized and in good condition;
  • rooftop equipment can be replaced without major redesign;
  • independent room-level zoning provides little value;
  • straightforward serviceability is a major priority;
  • the project budget does not justify extensive HVAC reconfiguration.

Warehouses, certain retail stores and other open commercial spaces may fall into this category.

When VRV May Make More Sense

VRV deserves closer consideration when:

  • the building contains many independently occupied rooms;
  • different zones experience substantially different loads;
  • tenant spaces require individual temperature control;
  • installing large new ducts would be disruptive;
  • a renovation has limited ceiling or shaft space;
  • building usage changes frequently;
  • heat recovery between simultaneously heating and cooling zones could be useful.

Which Dallas Commercial Buildings Are Good Candidates for VRV?

Dallas commercial building showing different cooling demands for offices, conference rooms, server rooms and vacant spaces
Different areas of a Dallas commercial building can experience different cooling loads because of occupancy, equipment, solar exposure and operating schedules.

VRV is particularly worth evaluating in buildings where zoning and changing loads create problems for conventional single-zone equipment.

Multi-Tenant Offices

Different tenants may operate different hours, use different equipment and prefer different temperatures.

Independent zoning can give building managers much finer control than treating an entire floor as one thermal zone.

Medical and Professional Offices

Rooms with different occupancy schedules and equipment loads can benefit from more granular control.

HVAC design for medical environments may involve additional ventilation, filtration, pressure or code requirements, however, so VRV alone should never be treated as the complete mechanical solution.

Hotels and Hospitality Properties

Guest rooms naturally create highly variable loads because occupancy changes continuously.

Individual room control can therefore be valuable.

Retail and Mixed-Use Buildings

A restaurant, retail store and office suite within the same property can have dramatically different internal loads and operating schedules.

A multi-zone system can help accommodate those differences.

Renovations and Older Buildings

Retrofitting large ductwork into an existing structure can require substantial ceiling, chase and structural space.

Smaller refrigerant piping can create useful design flexibility where duct installation is difficult.

Buildings With Strong Solar Exposure Differences

Dallas buildings with substantial glazing can experience dramatically different loads depending on orientation and time of day.

A west-facing office may need significant afternoon cooling while another portion of the property has a much smaller load.

Independent zones help the HVAC system respond to those differences.

When Is Traditional HVAC the Better Practical Choice?

Decision guide comparing VRV and traditional HVAC for Dallas commercial buildings based on zoning, ductwork and building needs
Choosing between VRV and traditional HVAC should account for zoning requirements, existing ductwork, building layout, installation constraints and long-term operating needs.

VRV is not automatically the appropriate upgrade simply because it is newer technology.

Traditional commercial HVAC can remain the more practical design when the building has:

  • relatively uniform loads;
  • extensive serviceable ductwork;
  • large open spaces;
  • an existing rooftop configuration that supports straightforward replacement;
  • limited need for individual-zone control;
  • operational staff already familiar with the installed system architecture.

Replacing functioning infrastructure purely to adopt a different HVAC technology can also change project economics substantially.

The better question is:

What problem is the HVAC replacement supposed to solve?

If the main problem is aging rooftop equipment but the duct system, zoning strategy and building layout remain appropriate, a high-efficiency conventional replacement may deserve serious consideration.

If the existing system creates persistent hot/cold zones, poor tenant control or difficult duct constraints, VRV becomes more compelling.

What Are the Disadvantages of VRV?

A credible VRV comparison needs to include its limitations.

More Specialized Design

VRV performance depends heavily on correct:

  • load calculations;
  • equipment selection;
  • refrigerant piping;
  • branch configuration;
  • controls;
  • electrical installation;
  • refrigerant charge;
  • commissioning.

ASHRAE maintains a dedicated guideline for the design, installation and commissioning of VRF systems, illustrating the importance of treating these systems as engineered networks rather than simply collections of indoor units.

Technician Expertise Matters

Troubleshooting inverter compressors, electronic expansion valves, communications networks and multiple indoor units can require VRV-specific diagnostic experience.

Property owners should consider long-term service capability during system selection—not after installation.

Ventilation Still Has to Be Designed

VRV indoor units primarily address heating and cooling.

Commercial buildings still need a ventilation strategy that satisfies the project’s applicable ventilation and indoor-air requirements.

Depending on the building, this may involve dedicated outdoor-air equipment or another engineered ventilation solution.

Refrigerant-System Design Requires Care

Because refrigerant piping may extend throughout occupied areas, refrigerant quantity, room volume, system architecture and applicable safety requirements must be evaluated during engineering and installation.

Controls Can Become Complex

Sophisticated zoning is valuable only when the controls are properly configured and building operators understand them.

Poor setup can undermine the advantages the system was designed to provide.


VRV vs Traditional HVAC Cost: What Should Dallas Building Owners Compare?

There is no responsible single “Dallas VRV cost” that applies to every commercial building.

A quote should reflect the actual project.

Major cost factors include:

  1. building size and calculated loads;
  2. number of temperature zones;
  3. number and type of indoor units;
  4. outdoor equipment configuration;
  5. refrigerant piping distances;
  6. electrical upgrades;
  7. controls and building-management integration;
  8. ventilation requirements;
  9. accessibility;
  10. roof or structural work;
  11. removal of existing equipment;
  12. commissioning;
  13. permitting and project-specific code requirements.

A VRV proposal may require greater initial design and controls investment than a simple like-for-like rooftop replacement.

But first cost alone is an incomplete comparison.

Owners should evaluate lifecycle considerations including energy consumption, maintenance, tenant comfort, zoning flexibility, future modifications, equipment accessibility and expected operating patterns.

Ask Contractors for Comparable Proposals

When comparing bids, request enough detail to determine whether contractors are pricing equivalent scopes.

Your comparison should identify:

  • equipment capacities;
  • efficiency ratings;
  • zoning;
  • ventilation;
  • controls;
  • electrical work;
  • refrigerant piping;
  • duct modifications;
  • permits;
  • commissioning;
  • warranties;
  • maintenance requirements;
  • exclusions.

A cheaper proposal may simply contain a smaller scope.

Can You Replace a Traditional Commercial HVAC System With VRV?

Yes, many commercial buildings can be converted from conventional HVAC to VRV, but it is not necessarily a direct equipment swap.

A retrofit assessment should examine:

Existing Ductwork

Some ducts may become unnecessary for space conditioning, while portions may remain useful for ventilation.

Electrical Capacity

Outdoor and indoor equipment, controls and associated components require an electrical design appropriate to the proposed system.

Refrigerant Piping Routes

Technicians need feasible routes between outdoor equipment, branch components and indoor units.

Condensate Drainage

Every indoor unit producing condensate needs proper drainage.

Outdoor Equipment Location

Roof and ground locations must account for equipment access, clearances, structural considerations and manufacturer requirements.

Ventilation

Removing a conventional air-distribution system cannot mean accidentally removing the building’s outdoor-air strategy.

Controls

Tenant scheduling, centralized monitoring and building automation requirements should be established before installation.

What Should a Professional Commercial HVAC Assessment Include?

Before recommending VRV or conventional HVAC, a commercial assessment should evaluate more than the age of the existing equipment.

Look for a process that considers:

  • building use and occupancy;
  • thermal zones;
  • operating schedules;
  • heating and cooling loads;
  • envelope and glazing;
  • existing equipment;
  • duct condition and layout;
  • ventilation requirements;
  • electrical infrastructure;
  • equipment access;
  • controls;
  • maintenance access;
  • future expansion plans.

Supremacy Services describes its HVAC installation process as including consultation, site assessment and evaluation of building layout, insulation, window orientation and North Texas climate loads before equipment recommendations.

That is the type of information needed for a meaningful VRV-versus-conventional comparison.

DIY vs Professional Commercial HVAC Decisions

Commercial HVAC technician evaluating VRV and rooftop equipment for a Dallas commercial building
A professional commercial HVAC assessment helps property owners compare VRV, rooftop and other HVAC configurations based on the building’s actual requirements.

There are useful steps a building owner or facility manager can perform before calling a contractor.

You Can Document

  • rooms with recurring comfort complaints;
  • existing equipment model information;
  • monthly operating schedules;
  • tenant occupancy patterns;
  • areas that are frequently vacant;
  • equipment or server rooms with high internal loads;
  • planned renovations;
  • historical repair problems.

Leave Engineering and Refrigerant Work to Qualified Professionals

Commercial system sizing, refrigerant piping, electrical work, commissioning and major repairs are professional tasks.

Texas regulates air-conditioning and refrigeration contracting through the Texas Department of Licensing and Regulation. Contractors performing covered installation, repair or maintenance work must meet applicable state licensing requirements.

For a commercial property, improper sizing or installation can affect far more than comfort—it can affect equipment reliability, operating costs and the performance of multiple occupied zones.


How to Choose Between VRV and Traditional Commercial HVAC

Use this five-step decision framework.

Step 1: Identify the Building’s Actual Problems

Are you trying to solve:

  • high operating costs?
  • repeated equipment failures?
  • inconsistent temperatures?
  • inadequate zoning?
  • tenant complaints?
  • lack of ceiling space?
  • failing ducts?
  • expansion requirements?

Do not select technology before defining the problem.

Step 2: Map the Thermal Zones

Identify spaces with substantially different:

  • occupancy;
  • orientation;
  • schedules;
  • equipment loads;
  • temperature requirements.

The greater the variation, the more valuable granular zoning may become.

Step 3: Assess Existing Infrastructure

Determine whether the building already has usable:

  • ductwork;
  • rooftop curbs;
  • electrical service;
  • controls;
  • equipment locations.

Existing infrastructure can materially change retrofit economics.

Step 4: Compare Lifecycle Requirements

Evaluate more than purchase price.

Compare:

  • installation scope;
  • expected energy use;
  • maintenance;
  • controls;
  • service availability;
  • zoning flexibility;
  • future modifications;
  • comfort requirements.

Step 5: Obtain a Building-Specific Design

The final decision should come from calculated loads and actual building conditions rather than rules such as “VRV always saves money” or “rooftop units are always cheaper.”

VRV vs Traditional HVAC: Which Is Better for Your Dallas Building?

For multi-zone offices, mixed-use properties, hotels, renovations and buildings with widely varying loads, VRV can offer compelling control and design flexibility.

For open commercial spaces, buildings with good existing ductwork or projects needing straightforward like-for-like equipment replacement, conventional rooftop or split systems may remain highly practical.

The decision therefore looks more like this:

Consider VRV when: zoning, part-load operation, architectural flexibility and individual space control are major priorities.

Consider conventional commercial HVAC when: the existing distribution system remains appropriate, loads are comparatively uniform and simplicity of replacement is more valuable than extensive zone-level control.

For many Dallas buildings, neither technology should be selected until the contractor understands how the property actually operates.


Frequently Asked Questions

Is VRV the same as VRF?

Technically, the underlying system concept is the same. VRF means Variable Refrigerant Flow, while VRV is terminology associated with Daikin’s Variable Refrigerant Volume systems.

Is VRV good for commercial buildings?

Yes, VRV can be particularly useful in commercial buildings with multiple zones, varying occupancy schedules or different heating and cooling loads. Suitability still depends on the specific building.

Is VRV better than a rooftop HVAC unit?

Not universally. VRV generally provides more granular zoning, while packaged rooftop units can be highly practical for open spaces and buildings with existing usable duct infrastructure.

Can VRV heat and cool different rooms simultaneously?

Certain heat-recovery VRV/VRF configurations can provide simultaneous heating and cooling to different zones when properly designed.

Does VRV require ductwork?

VRV uses refrigerant piping to distribute most heating and cooling, so large space-conditioning ducts may be reduced. The building still needs an appropriate ventilation system.

Can VRV replace an existing commercial HVAC system?

Often, yes. However, the retrofit requires assessment of refrigerant piping routes, electrical capacity, ventilation, condensate drainage, equipment locations and controls.

Is VRV appropriate for Dallas weather?

VRV can be suitable for Dallas, but equipment selection and system design must account for actual building loads and manufacturer operating specifications. Dallas’ long cooling season makes proper cooling design particularly important.

Does VRV require specialized maintenance?

VRV systems contain inverter-driven compressors, electronic controls, communication networks and multiple indoor units, so technicians familiar with VRV/VRF diagnostics are valuable.

How do I know which commercial HVAC system my building needs?

Start with a professional load and building assessment. The contractor should consider layout, occupancy, operating schedules, existing infrastructure, ventilation, zoning and future building use before recommending equipment.


Get a Commercial HVAC Assessment in Dallas

Choosing between VRV and traditional commercial HVAC should not begin with a brand or equipment brochure. It should begin with the building.

Supremacy Services provides commercial HVAC and VRV services across Dallas and the DFW Metroplex. A building assessment can help determine whether VRV, rooftop equipment or another commercial HVAC configuration better matches your property’s loads, zoning requirements, infrastructure and operating goals.